
MotionCam - User Manual
MOTIONCAM USER MANUAL: MotionCam is an indoor motion detection device with image-based confirmation. The device uses Jewellery to transmit alarm and activity signals, and the Wings protocol for image transmission.

MotionCam User Guide

MotionCam is an indoor motion sensor with image verification capabilities. It boasts a built-in battery that lasts up to four years, detects motion up to 12 meters, is pet-resistant, yet can instantly detect humans. MotionCam operates within the Ajax security system, connecting to the Hub via two secure wireless protocols. It uses Jewellery to transmit alarm and activity signals, and Wings protocol for image transmission. The wireless connection range is up to 1,700 meters in an unobstructed environment.
This device is only compatible with Hub 2. It does not support connections with Hub 2 , Hub Plus , ReX (signal booster), ocBridge Plus , or uartBridge !
The device is set up via iOS, Android, macOS, and the Ajax application on Windows. Users will be notified of all alerts and events via push notifications, SMS, and phone calls (if enabled).
The Ajax security system can be used for independent monitoring or connected to a central monitoring center of a security service company.
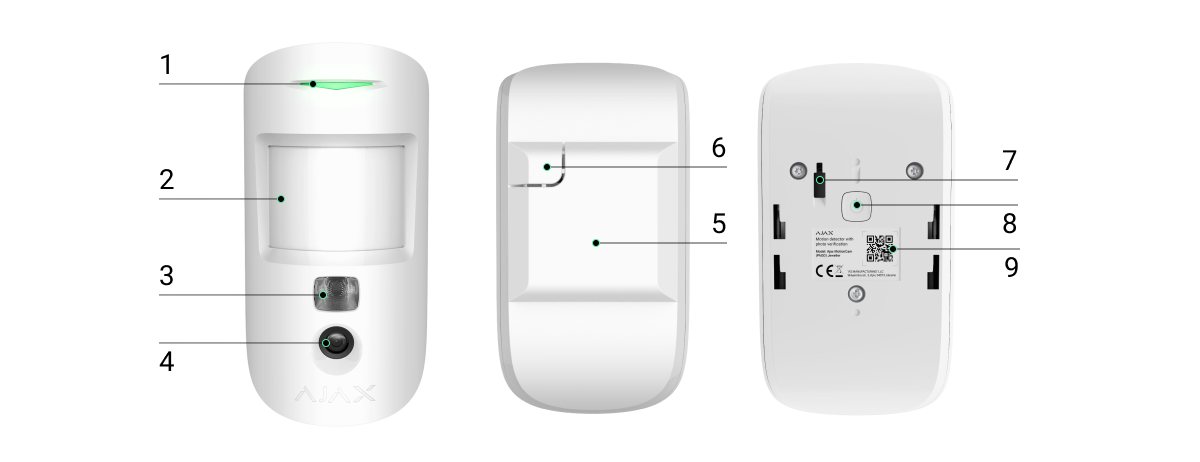
Feature details
-
LED signal lights
-
Motion sensor
-
Infrared night vision light
-
Camera
-
SmartBracket mounting plate (The dotted section is necessary for vandalism protection in case the device is removed from its mounting position)
-
Vandal-proof switch
-
Power button
-
QR Code
Operating principle
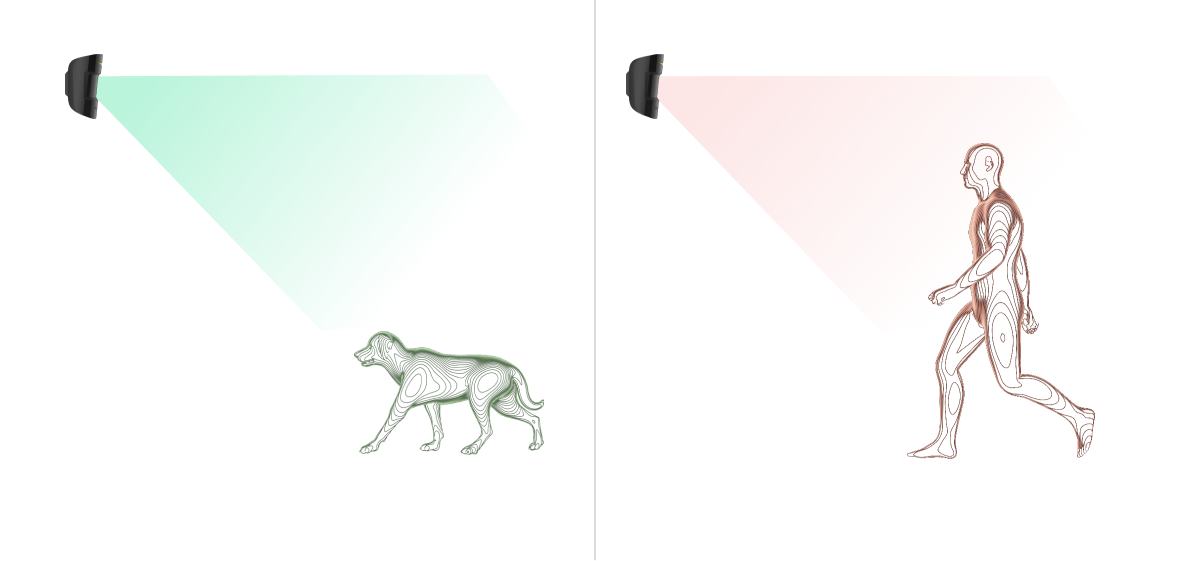
The MotionCam's PIR (Passive Infrared) temperature sensor detects intrusions into a protected room by detecting the movement of objects with temperatures close to human body temperature. This makes the device immune to pets – simply select the appropriate sensitivity in the settings.
When motion is detected, the device, which is in protection mode, will immediately send an alarm signal to the hub. The hub will activate the linked sirens and send notifications to the user and the security company. MotionCam uses the Jewellery protocol to send alarm signals and events to the hub.
MotionCam's camera can capture 1 to 5 images at 320x240 resolution and up to 3 images at 640x480 pixel resolution. The sequence of images will be displayed in the application as a video so users can assess the event unfolding. The images will be displayed on both the Ajax application and the security company's main monitoring center software. MotionCam uses the Wings protocol to send images to the hub.
The device is equipped with an additional infrared night vision light that will only activate when pressed.
Image transmission speed depends on the resolution and speed of your internet connection. The following table shows the average time to transmit one image to the hub with a connection strength of 2-3 bars between the MotionCam and the hub, via Ethernet.
|
Image resolution |
Transmission time |
|
160 × 120 |
Approximately 7 seconds |
|
320 × 240 (default) |
Approximately 9 seconds |
|
640 × 480 |
Approximately 20 seconds |
At the same time, the alarm will be transmitted within 0.15 seconds.
Connect the device to the Hub.
Before starting the connection:
-
Turn on the Hub and check your internet connection (via Ethernet cable or GSM network).
-
Install the Ajax app on your phone. Create a user account, add the Hub to the app, and create at least one room.
-
Check and make sure that the Hub is in the Disabled mode and not updating (via the status displayed in the application).
⚠️ Only users with administrator privileges can add new devices to the Hub.
To connect the device:
-
Select “Add device” in the Ajax app.
-
Name the motion sensor device, scan the QR code or manually enter the device's code into the app (the code is located under the lid and on the box), and select the Room for the device.
-
Select “Add” — the countdown will begin.
-
Turn on the device by holding the power button for 3 seconds. Please note that requests from the hub will only be sent for a short time while you are turning the device on.
For the device to function effectively and without interference, the sensor must be placed within the wireless coverage area of the Hub (with a protective object).
MotionCam will automatically power off after 6 seconds if it fails to connect to the hub. You don't need to turn the device off when you want to try connecting again.
If the device is already connected to a different hub, turn it off and follow the normal connection instructions.
Once connected, the sensor device will appear in the list of connected devices. The frequency of signal scanning will depend on the settings on the Hub, with a default of 36 seconds.
Status
You can monitor the MotionCam's status in the device's menu.
-
Ajax app -> Devices -> MotionCam
|
Parameter |
Meaning |
|
Temperature |
The device's temperature, measured at the processor, changes constantly. |
|
Jeweller wave intensity |
Signal strength for transmitting alarm signals between the device and the Hub. |
|
Battery capacity |
The remaining battery level of the device is displayed in 25% increments. |
|
Lid |
The device's anti-tampering mechanism reacts when the device is removed from its installation location or the housing is damaged. |
|
Entry delay, seconds |
Entry delay (alarm trigger delay) is the amount of time it takes for the system to deactivate when you enter a room. |
|
Delay when exiting, seconds |
Exit delay (alarm activation delay) is the amount of time it takes for the system to deactivate when you leave the room. |
|
Connect |
Connection status between the hub and the device |
|
Wings signal strength |
Signal strength for image transmission from the device to the Hub |
|
Camera |
Connection status between the hub and the device's camera. |
|
Sensitivity |
Sensitivity of the motion sensor |
|
Always activated |
If enabled, the sensor will always be in activated mode. |
|
Firmware |
Device firmware version |
|
ID |
Device ID |
Settings
You can change the following parameters in the settings:
-
Ajax app -> Devices -> MotionCam -> Settings
|
Setting |
Meaning |
|
first line |
Device name (subject to change) |
|
Room |
The physical room for assigning devices. |
|
Sensitivity |
MotionCam has 3 sensitivity levels:
|
|
Always active |
In this mode, the device is always in motion-tracking mode, regardless of the system's status. This mode is used for rooms requiring continuous 24/7 monitoring. |
|
Image resolution |
MotionCam captures images at the following resolution:
The higher the resolution, the more detailed the image, and the longer it takes to send it to the Hub. |
|
Send images when an alert is triggered. |
If activated, the device will take between 1 and 5 photos. If you select "No photo," the device will not activate the camera when an alarm is triggered. |
|
Alarm does not require image confirmation. |
MotionCam can take a picture each time an alarm is triggered or up to 10 times the alarm is activated. The limit will be reset when the system is deactivated. |
|
Entry delay, seconds |
Set the entry delay (alarm trigger delay), which is the amount of time it takes for the system to deactivate when someone enters the room. |
|
Delay when exiting, seconds |
Set the exit delay (alarm activation delay), which is the amount of time it takes for the system to deactivate when you leave the room. |
|
Lag in night mode |
Enable delay when Night Mode is selected. |
|
Activated in Night Mode |
If selected, the device will activate when you enter night mode. |
|
The alarm sounds when motion is detected. |
If activated, HomeSiren and StreetSiren will trigger when motion is detected. |
|
Jeweller signal strength test |
Switch the device to Jeweller signal strength test mode. This test will check the signal strength between the Hub and the device, helping to determine the optimal installation location. |
|
Check Wings signal strength |
Switch the device to Wings signal strength test mode. This test will check the signal strength between the Hub and the device, helping to determine the optimal installation location. |
|
Check the detection area. |
Switch the device to detection zone test mode. This helps test the motion detection area and determine the optimal installation location. |
|
Check for decline |
Switch the device to attenuation test mode. |
|
User manual |
Open the device's user manual. |
|
Disconnect the device. |
Disconnect the device from the Hub. |
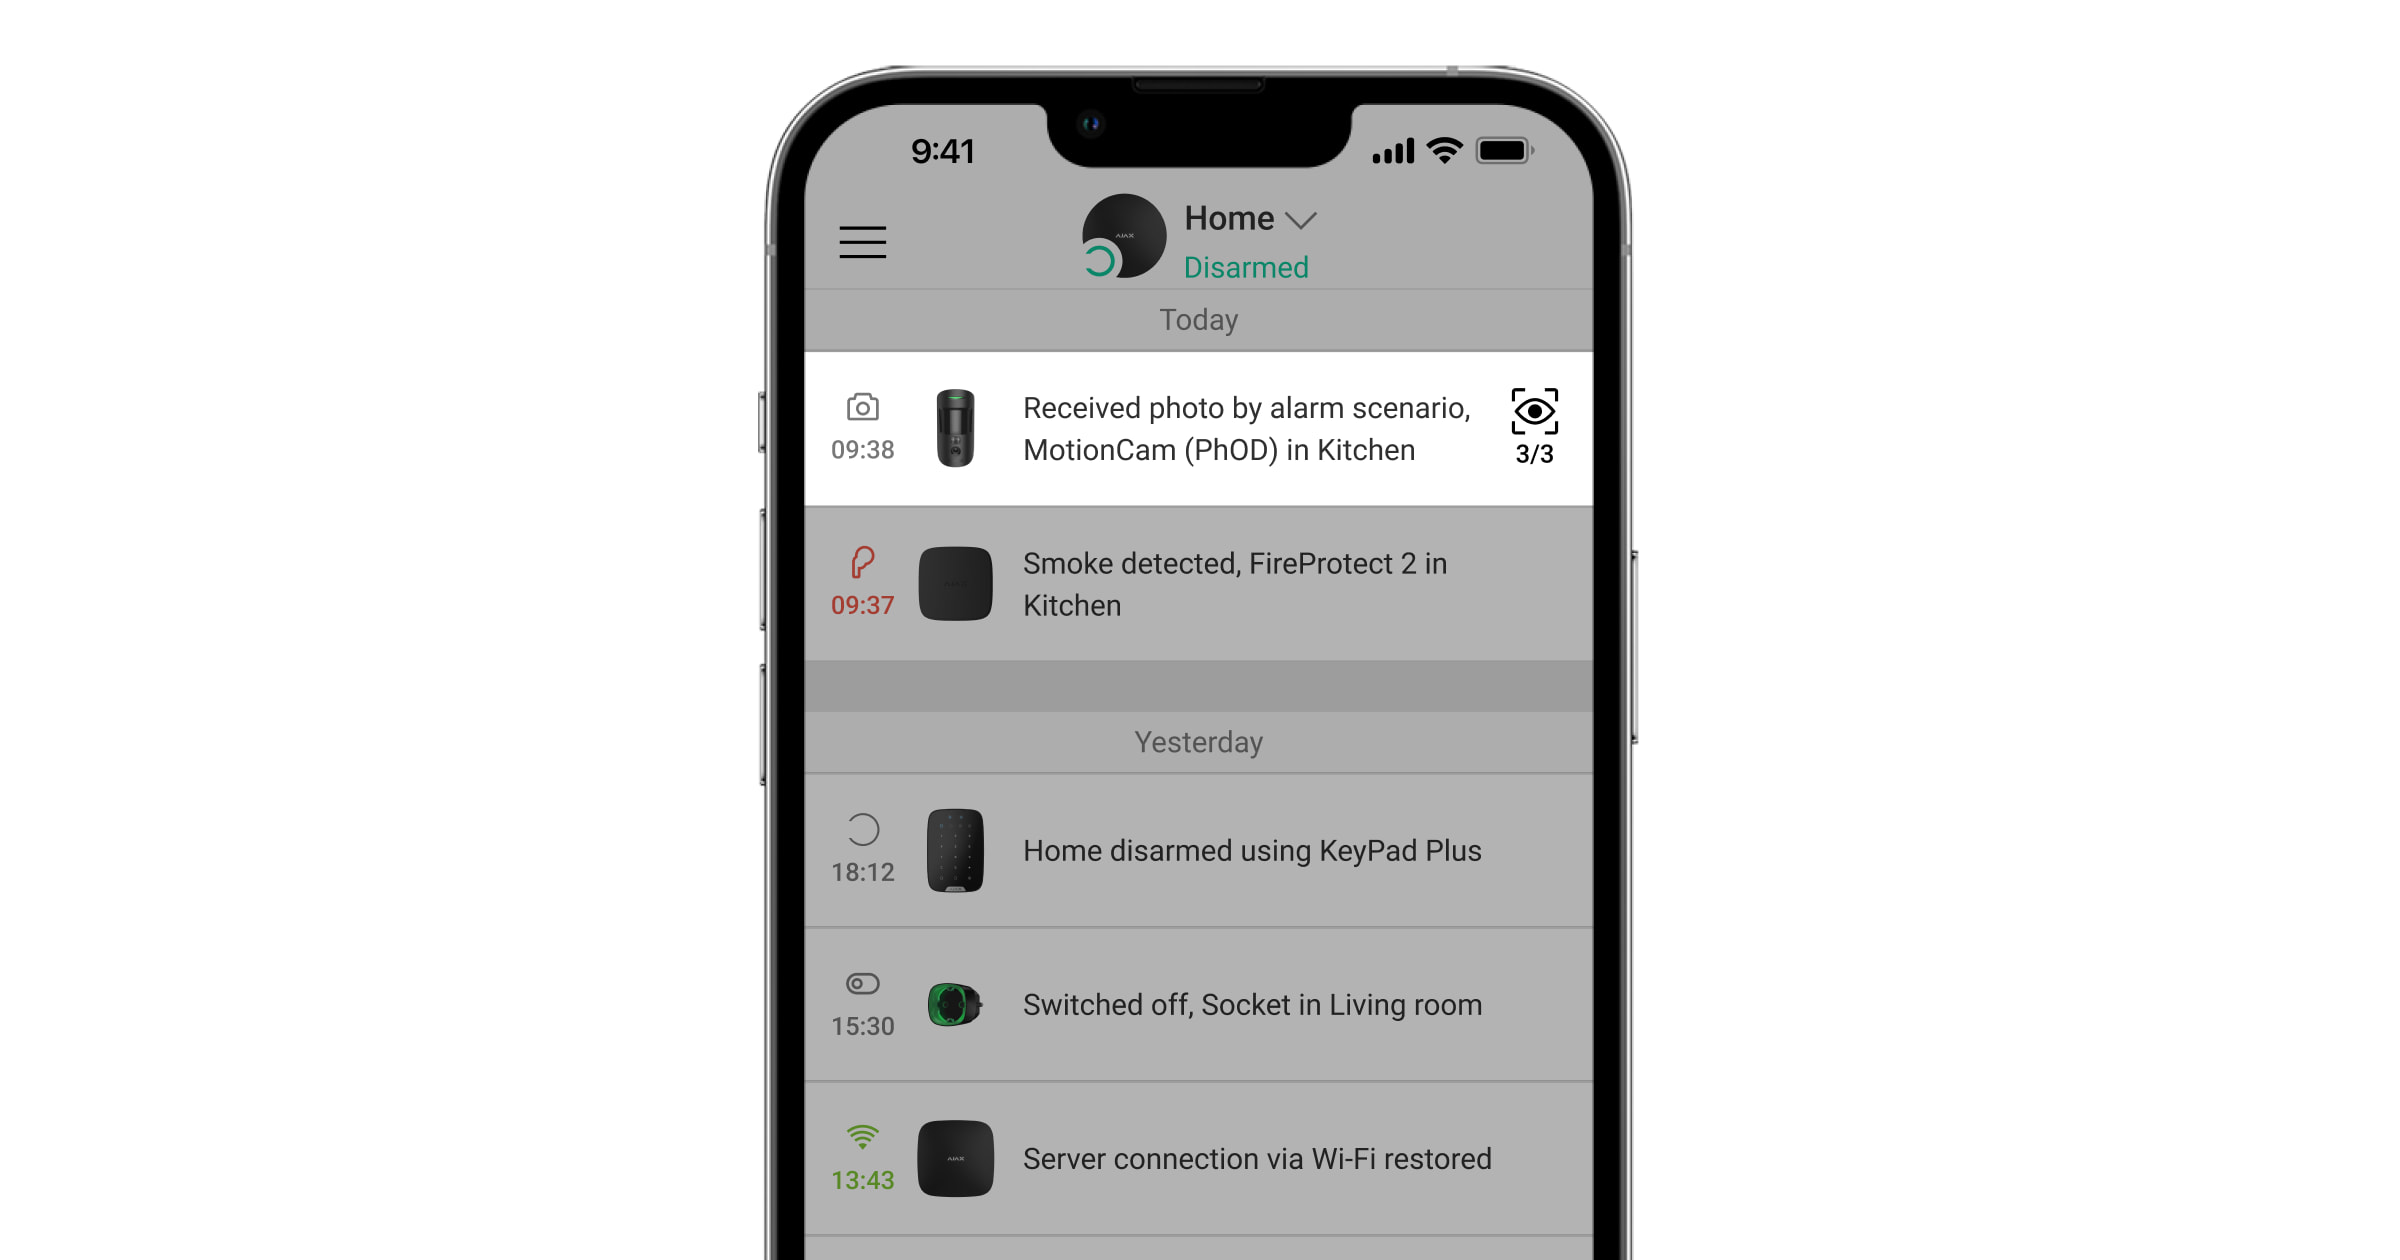
Confirm with images when an alarm is triggered in the Ajax application.
If you select "Send images on alarm" in MotionCam's settings, the alarm from the device will be accompanied by a sequence of images sent to the Ajax application.
To view the images, click on the alert message in the event series.
To save the image, press the button on the side.
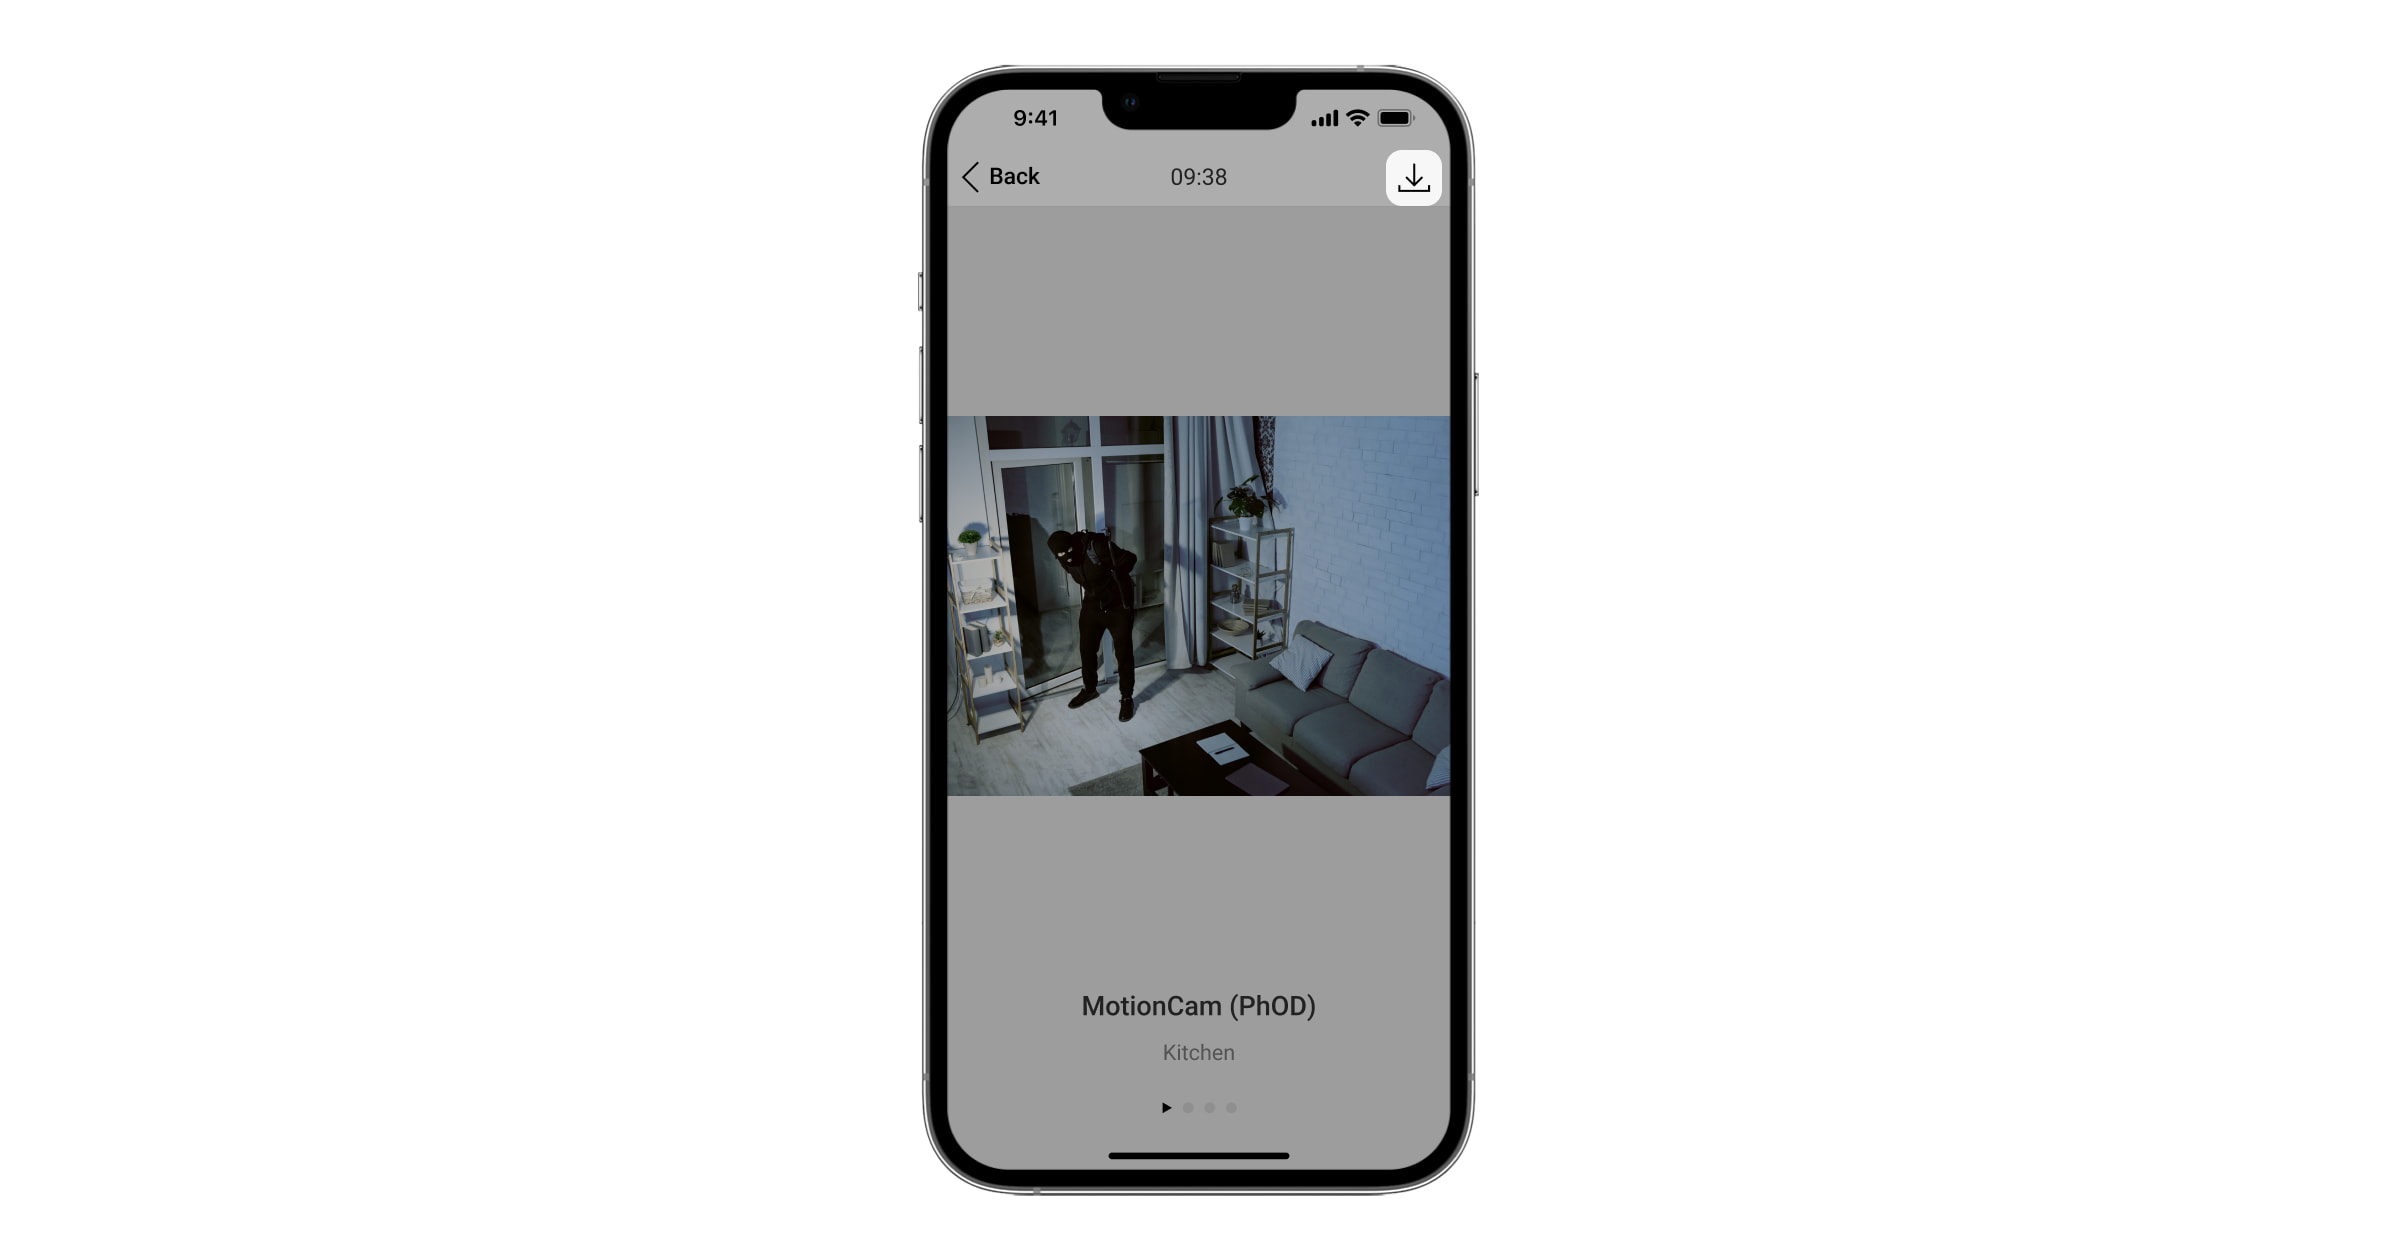
A series of images will be displayed in the app as a clip, allowing users to accurately assess the event.

Each frame of the sequence can be saved independently. You can save all the images as an MP4 video.
Signal
The MotionCam's LED indicator lights can flash red and green, depending on the device's status.
Notification when the device's power button is pressed.
|
Event |
Signal |
|
Turn on the power |
The green light illuminates when the device is turned on. |
|
Turn off the power. |
The red light comes on and flashes 3 times. |
Signals when the device is activated.
|
Event |
Signal |
Note |
|
The device is connected to the Hub. |
The green light will illuminate for a few seconds. |
|
|
Hardware failure |
Red flashing |
The device needs repair, please contact Support Services. |
|
An alarm or anti-vandalism device has been activated. |
The green light will illuminate for about 1 second. |
|
|
The battery needs replacing. |
The green light illuminates slowly and then fades away when an alarm is sounded. |
To replace the battery, please refer to the Battery Replacement Instructions. |
Check the features
Ajax security systems can run multiple tests to determine the functionality of connected devices.
Tests do not start immediately but within 36 seconds by default. The test delay will depend on the device's scan cycle setting (see Jeweller settings in the Hub settings).
All tests can be accessed in the device's settings menu (Ajax app -> Devices -> MotionCam -> Settings):
-
Check the intensity of the Jesseneller wave.
-
Check the intensity of the Wings wave.
If any interference is detected or the signal strength is too weak to transmit images, the user will receive a push notification: “Wings frequency is experiencing significant interference.”
Device placement
The placement of the device will directly affect the effectiveness of the entire security system. The placement of the MotionCam device is determined by the distance between the device and the hub; the presence of obstacles between the devices will affect radio wave transmission: walls, concrete floors, large objects placed in the room.
When choosing a location for installation, consider the lens aperture, the viewing angle of the sensor and camera, and the presence of obstructions in the field of view. You should point the lens towards the area of the room where potential intrusions are likely. Ensure that furniture, plants, vases, decorations, and glassware do not obstruct the device's view.
Horizontal and vertical viewing angles of the device
The device will not detect movement behind the glass. Therefore, the device should not be installed in a location where its view is obstructed by glass objects. For example, a location where an open window would block the device's view.
Remember to check the signal strength at the installation location. If the signal strength is only one bar, Ajax cannot guarantee that the system will function perfectly.
If the signal strength is poor, do everything you can to improve the signal quality! At the very least, try moving the device; even just 20 cm can significantly improve the connection quality.
Equipment installation
Before installing the device, make sure you have selected a suitable installation location as instructed in the user manual.
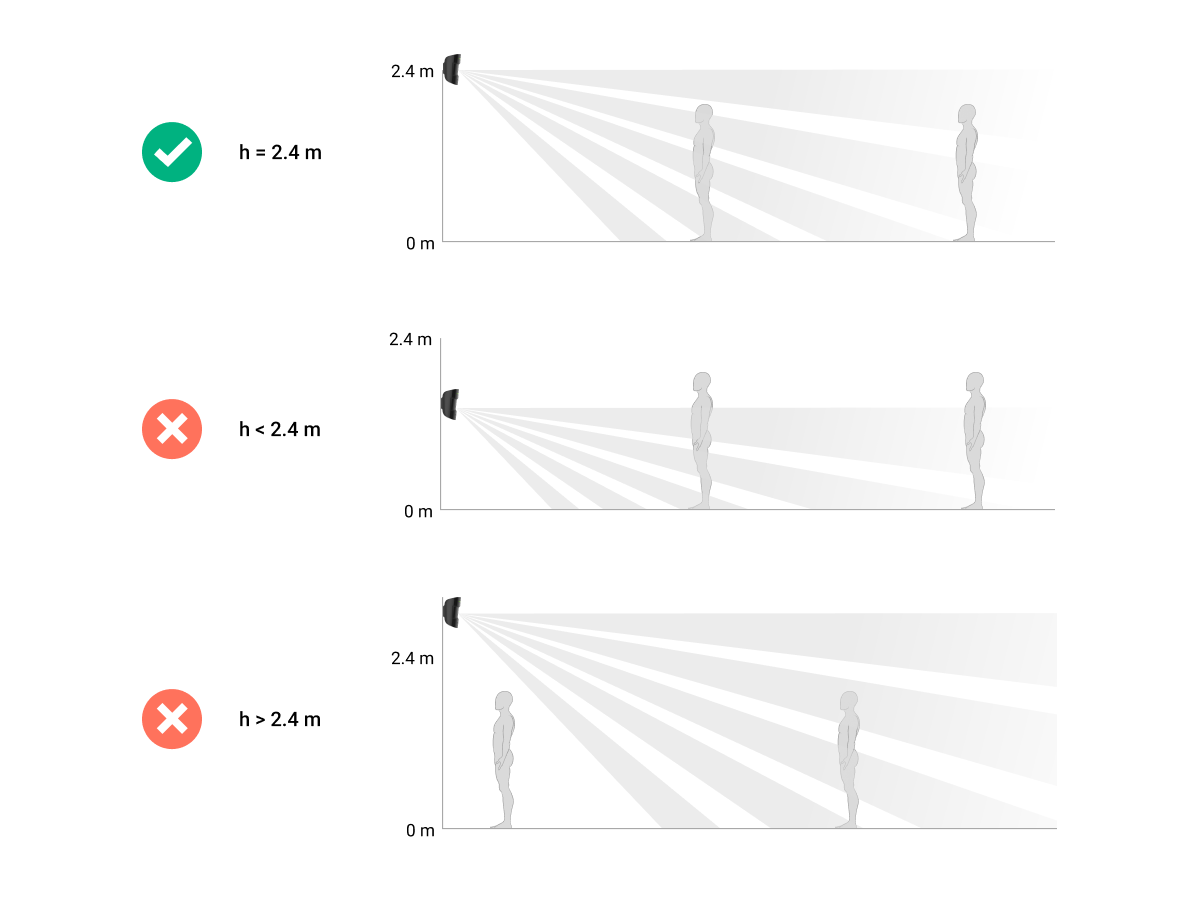
The recommended installation height is 2.4 meters. If the sensor is not installed at the recommended height, it will reduce the scanning range and affect the animal immunity feature.
Use the SmartBracket mounting plate to hang your MotionCam on a flat surface or in a corner. The SmartBracket has special markings to make it easy to secure it with screws.
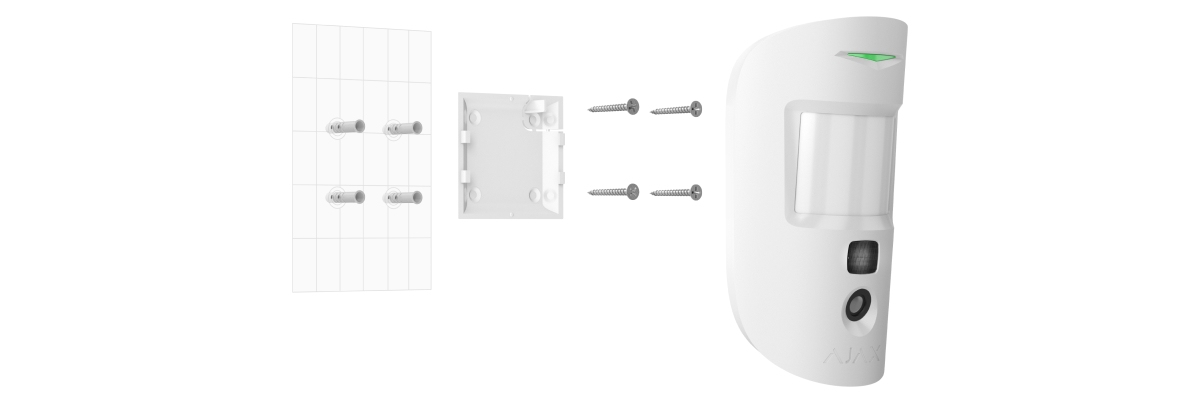
To install the equipment:
-
Attach the SmartBracket mounting plate to a flat surface using screws, utilizing at least two mounting holes. To ensure the vandal-proof feature functions correctly in case someone attempts to remove the device, secure the dotted cutout of the SmartBracket.
-
Double-sided tape should only be used as a temporary fixation solution for equipment. The tape will dry out over time and could cause the equipment to fall, leading to malfunction or potentially damaging the equipment due to the fall.
-
Place the device on the mounting bracket. As soon as the device is secured on the SmartBracket, its LED will flash – this signals that the device's tamper-proof cover has been closed.
If the device's LED indicator light does not illuminate after installation on the SmartBracket, check the vandal-proof mode status in the Ajax Security System app and adjust the tightness of the mounting bracket.
No equipment installed:
-
In the outdoor area;
-
Position the lens facing the window to avoid direct sunlight.
-
Facing objects with rapidly changing heat sources (e.g., electric stoves, gas stoves)
-
Facing moving objects with temperatures close to human body temperature (e.g., curtains that absorb heat and sway).
-
In areas with fast airflow (right near a fan, open window, or door)
-
Being close to metal objects or bed surfaces can cause signal degradation and affect the image signal.
-
Under conditions where temperature and humidity exceed the device's operating limits.
-
Within 1 meter of the Hub.
Maintenance
You should regularly check the functionality of the Ajax security system. Clean the device body of dust, cobwebs, or other dirt. Use only a soft, dry cloth for maintenance.
Do not use cleaning agents containing alcohol, acetone, or gasoline to clean the device. Clean the lens carefully – any scratches can affect the device's sensitivity.
The pre-installed battery ensures automatic operation for up to 3 years. If the battery is detected to be low, the security system will send corresponding notifications and the LED will light up and turn off if the detector detects any movement or if the anti-vandalism feature is activated.
Instructions for replacing the battery
Technical specifications
|
Sensitivity component |
PIR sensor |
|
Motion detection range |
Up to 12 meters |
|
Motion detection angle (Horizontal/Vertical) |
88.5°/80° |
|
Image resolution |
Up to 640 × 480 pixels |
|
Number of photos taken during the alarm |
Up to 5 photos per alert |
|
Infrared night vision light |
Have |
|
Pet immunity |
Weighing up to 20 kg and standing up to 50 cm tall. |
|
Protection against vandalism |
Have |
|
Bandwidth |
868.0 – 868.6 MHz or 868.7 – 869.2 MHz, depending on the sales region. |
|
CMS compatibility |
Motion detection alerts are sent to CMS systems that support SIA and Contact ID protocols. Confirm that the images have been sent to Manitou CMS and the Ajax PRO Desktop application. |
|
Maximum RF output intensity |
Up to 20 mW |
|
Wireless module |
GFSK |
|
Connection range (without obstacles) |
Up to 1,700 meters |
|
Power supply |
2 CR123A, 3V batteries |
|
Battery life |
Up to 4 years |
|
Operating temperature |
From 0°C to +40°C |
|
Operating humidity |
Up to 75% |
|
Size |
135 × 70 × 60 mm |
|
Weight |
167 g |
The complete set includes
-
MotionCam
-
SmartBracket hanging board
-
2 CR123A batteries (pre-installed)
-
Installation screw set
-
User manual
Guarantee
AJAX SYSTEMS MANUFACTURING Limited Liability Company provides a 2-year warranty for this product. Batteries are not included.
If the device is not working as designed, please contact our technical support team before sending it in for warranty service – as over 50% of cases are simply issues with settings adjustments.