
MotionProtect Outdoor - User Manual for Outdoor Motion Sensors
The MotionProtect Outdoor is a wireless outdoor motion sensor designed to resist cover and false alarms. The sensor reads signals from a PIR sensor, detects motion, and transmits a notification to the central unit via a flashing green LED.

Instructions for using MotionProtect Outdoor
MotionProtect Outdoor is a wireless outdoor motion sensor with protection against cover and false alarms. The Ajax security system connects via the Jeweler security protocol, with a communication range of up to 1700 meters in unobstructed areas. It can operate for up to 5 years from its built-in battery or external power source. It detects motion at a distance of 15 meters and does not react to animals.
The sensor only works with one hub. Connection to ocBridge and uartBridge integrated modules is not provided.
The sensor is configured via a mobile app for smartphones on iOS and Android. Push notifications and SMS messages will inform the user of all system events.
The Ajax security system can be used independently, or you can connect it to a security company's control panel.
👉 Buy the MotionProtect Outdoor sensor now!
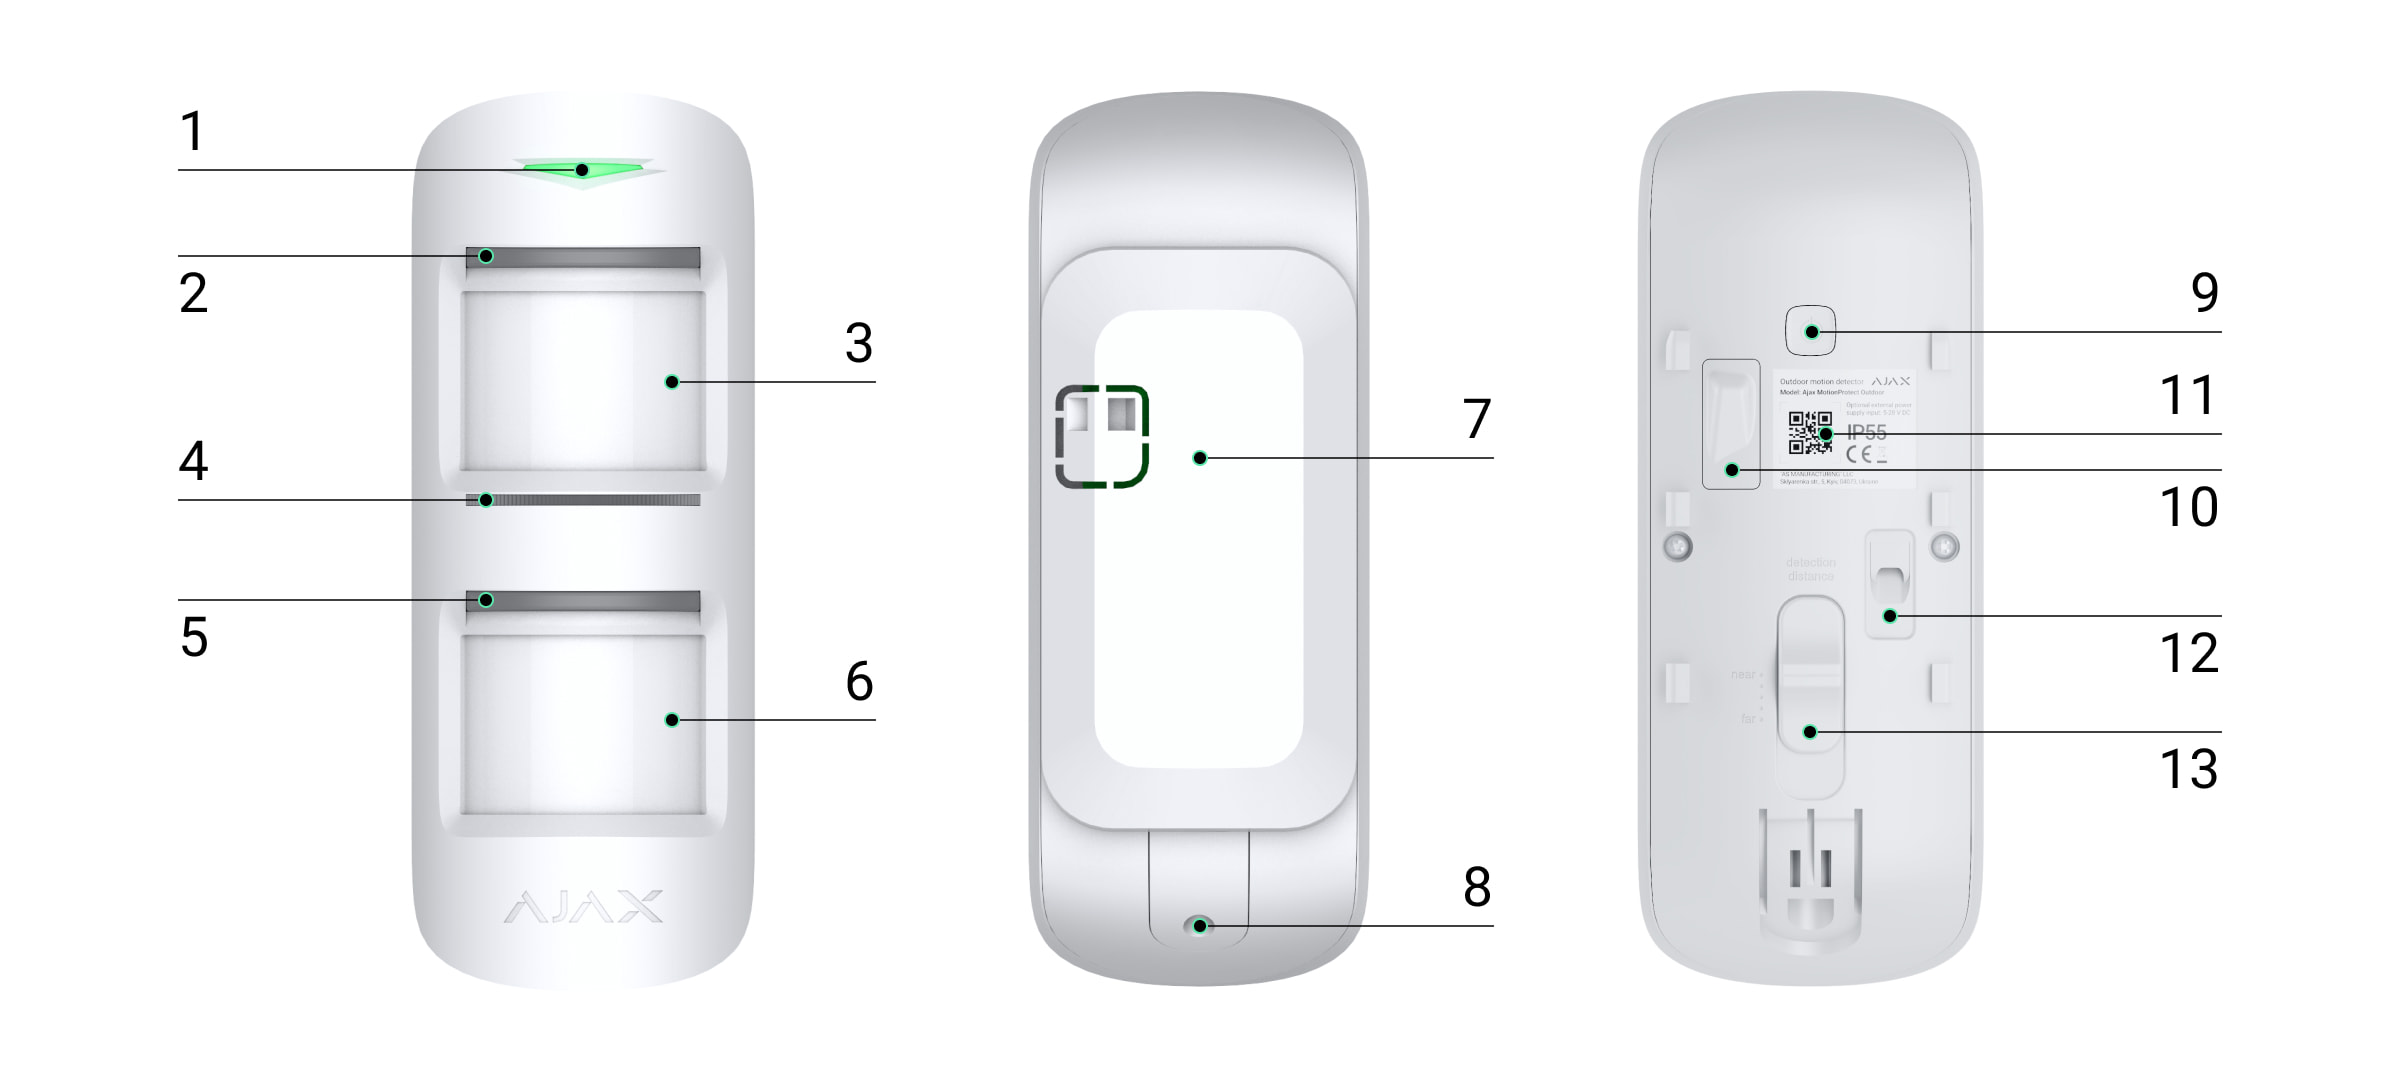
Features and details
-
Main indicator light
-
PIR sensor and Anti-Opaque sensor
-
Motion sensor lens on top
-
Anti-Vannish Sensor
-
Bottom PIR sensor and Anti-Opaque sensor
-
The lens of the motion sensor is lower.
-
SmartBracket repair board (the perforated section is necessary to activate the anti-vandalism feature when attempting to tear the sensor from the surface)
-
Holes for securing the SmartBracket mounting board with screws.
-
Power button
-
Vandal-proof switch
-
QR code
-
Connector for external power cable
-
Detection range slider
Operating principle
When the system is protected, the sensors continuously read signals from the two PIR sensors. Upon detecting motion, the sensors immediately transmit an alarm to the control panel and a signal by flashing a green LED.
|
MotionProtect Outdoor only transmits alerts to the central hub when both PIR sensors are activated, with a delay of no more than 1.5 seconds, ensuring that their signals are identical. |
|
Motion detection alerts are triggered every 5 seconds. |
Anti-shading system
An overlay is an attempt to block the view of a sensor lens in any way.
MotionProtect Outdoor detects these types of coverings:
-
Obstacles in front of both lenses (an object approximately the same size as the sensor body is located in front of the sensor at a distance of 20 cm)
-
An obstacle in front of any lens (an object placed 10 cm in front of one of the lenses)
-
Draw or stick frosted material onto any lens.
-
Cover the front of the sensor with a frosted material.
-
Apply spray/paint or brush paint to the front surface of MotionProtect Outdoor.
If one or more types of covering are detected, the sensor will generate a covering alarm and the green LED on the sensor light will illuminate for 1 second.
The sensor detects anti-covering in both activated and deactivated modes.
Reaction time to Anti-Mask
|
Anti-coverage type |
Operating mode (sensor protection) |
Passive mode (sensors are unprotected) |
||
|
Time to trigger the alarm, seconds |
Recovery time, seconds |
Time to trigger the alarm, seconds |
Recovery time, seconds |
|
|
Obstacles for both lenses |
1 |
5.4 |
300 |
18 |
|
An obstacle for any lens. |
150 |
13 |
150 |
5.4 |
|
Stick or draw any lens |
150 |
13 |
150 |
5.4 |
|
Stick it to the front of the sensor. |
150 |
9 |
300 |
18 |
|
By applying spray paint/paint or brushing the front surface of the sensor. |
150 |
9 |
150 |
9 |
Connect the sensor to the hub.
Before you begin connecting the sensors:
-
Follow the center's instructions and install the Ajax app on your smartphone. Create an account, add a center to the app, and create at least one room.
-
Switch to the Ajax application.
-
Turn on the hub and check the internet connection (via Ethernet cable and/or GSM network).
-
Ensure that the hub is not being equipped or updated by checking its status in the mobile app.
Adding a device to the hub can only be done by users with administrator privileges.
How to connect MotionProtect Outdoor to the control panel:
-
Click on Add device in the Ajax mobile app.
-
Name the device, scan or manually enter the QR code (located on the packaging), select the room location. And click Add - the countdown will begin.
-
Turn on the device by holding the power button for 3 seconds.
To detect and trigger an alarm, the device must be placed within the radio coverage area of the hub (on the same protected object). The connection request to the hub is only transmitted when the device is powered on.
MotionProtect Outdoor will automatically turn off 6 seconds after being powered on if it fails to connect to the hub. To try connecting again, you don't need to disconnect the device.
If the sensor has already been assigned to a different hub, turn off MotionProtect Outdoor, and then follow the standard additional procedure.
A sensor connected to the hub will appear in the list of hub devices in the application. The status of the devices in the list updates depending on the polling time set in the hub's settings, with a default value of 36 seconds.
To avoid the Anti-Covering alarm, disable Anti-Covering mode in the sensor settings before installation.
Device states
Devices → MotionProtect Outdoor
|
Parameter |
Meaning |
|
Temperature |
Temperature on the sensor processor (gradual change) |
|
Signal strength |
Signal level between hub and sensor |
|
Charging the battery |
The battery charge level is indicated by a sensor, displayed in 25% increments. |
|
Counter-sabotage |
The vandal-proof device's status, its response to attempts to remove and detach it from its mounting bracket. |
|
Entry delay, seconds |
Delayed entry |
|
Output delay, seconds |
Delay after security system activation |
|
Connect |
Connection status between hub and sensor |
|
Sensitivity |
Sensor sensitivity: low, medium, high |
|
Anti-coverage |
It is an anti-masking option. |
|
Always active |
If enabled, the sensor will constantly detect motion. |
|
Software |
Sensor software version |
|
Device ID |
Device unique identifier ID |
Device settings
Devices → MotionProtect Outdoor → Settings (⚙️)
|
Customization |
Meaning |
|
first school |
The sensor name can be edited. |
|
Room |
Select a virtual room where the device is assigned. |
|
Sensitivity |
Select the sensor sensitivity level: low, medium, high |
|
Anti-coverage |
When in operation, the sensor always detects Anti-Opaque. |
|
Always active |
When switched on, the sensor constantly detects movement. |
|
Entry delay, seconds |
Set the reaction delay upon entry. |
|
Output delay, seconds |
Delay after security system activation |
|
Nighttime security |
If enabled, the sensor will switch to security mode when using night mode. |
|
Allow for a delay in night mode. |
When enabled, the sensor will implement a delay in night mode. |
|
Activate the alarm if motion is detected. |
When activated, the HomeSiren and StreetSiren sirens will sound when motion is detected. |
|
Put the sensor into signal level test mode. |
|
|
Switch the sensor to one of the detection zone tests:
|
|
|
Switch the sensor to signal extinction test mode (available for sensors with software version 3.50 or higher). |
|
|
User manual |
Open the sensor's user manual. |
|
Remove the device. |
Disable the sensor from the hub and remove its settings. |
Signal
The MotionProtect Outdoor 's LED light can illuminate in red or green, depending on the device's status.
Indicated when you press the power button:
|
Event |
Assign |
|
Press the power button (to turn on the sensor). |
The red light comes on when the button is pressed. |
|
Turn on the power |
The light remains green until the device turns on. |
|
Power off |
The light was red first and then flashed three times. |
Sensor after power-on:
|
Event |
Assign |
Note |
|
Connect the sensor to the hub. |
The light stays green for a few seconds. |
|
|
Hardware failure |
Flashing red continuously |
The sensor needs repair; contact customer service. |
|
Motion, tamper-proof, or vandalism alarms |
The blue light lasted for about a second. |
|
|
The battery needs replacing. |
In the event of an alarm, it will light up slowly and then turn off with a green light. |
Replacing the sensor battery is described in the Battery Replacement section. |
Check the features
Ajax security systems allow you to conduct tests to verify the performance of connected devices.
Tests do not begin immediately, but no later than 36 seconds with standard settings. The test start time depends on the sensor polling time setting (Jeweler's setting in the central settings).
According to the requirements of EN50131, the radio signal level sent by wireless devices will decrease during test mode.
Device settings
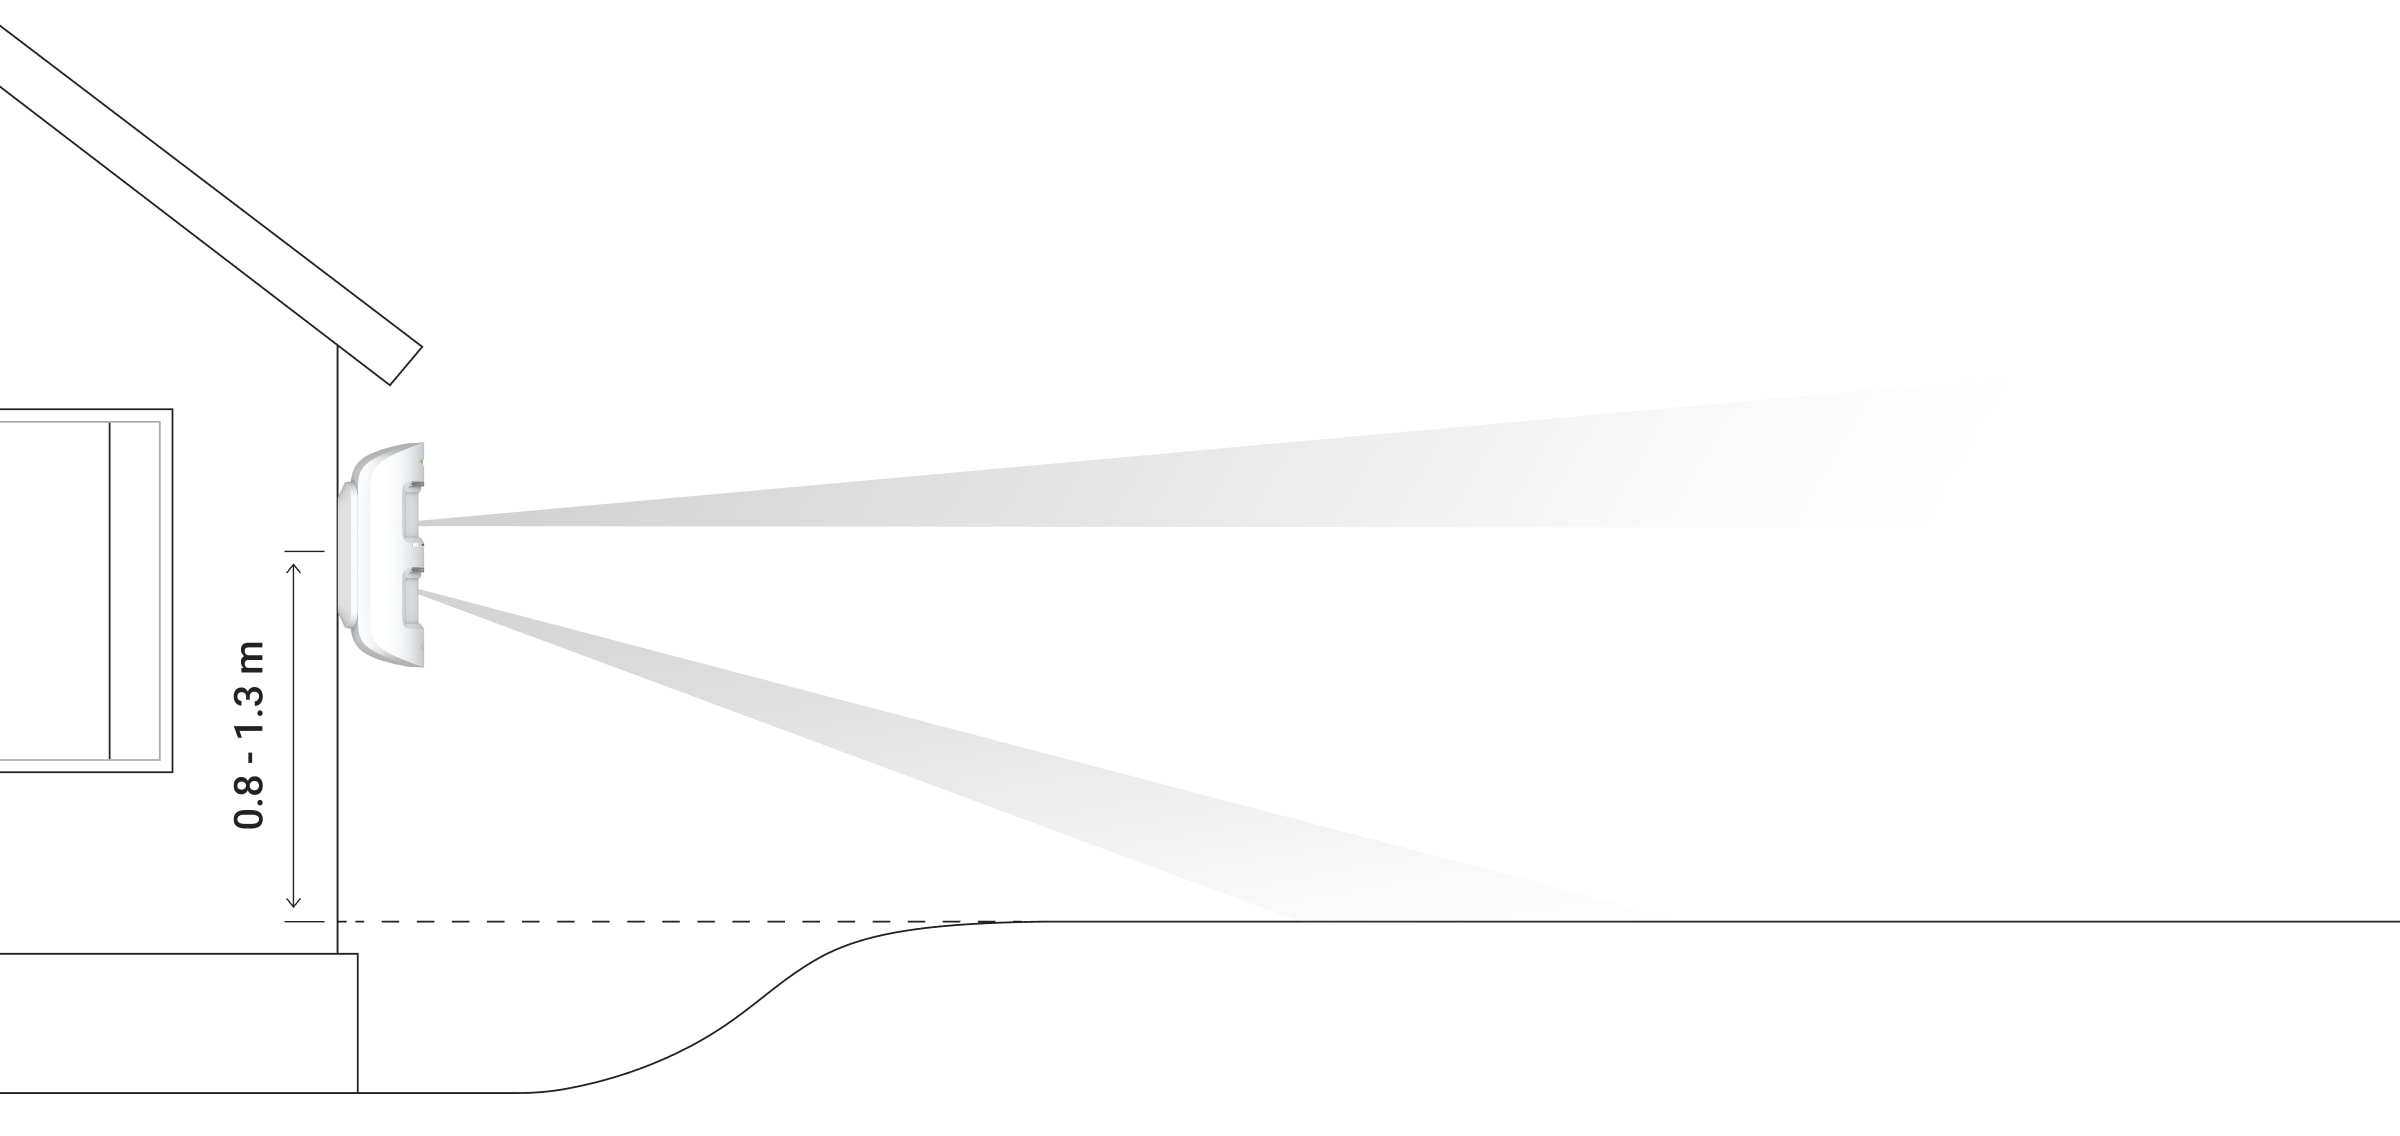
Before installing the device, check the signal level.
MotionProtect Outdoor should be placed at a height of 0.8 - 1.3 m. The sensor housing should be positioned so that the axis of the lens is parallel to the ground and the intruder intending to enter is perpendicular to the lens axis.
MotionProtect Outdoor only sends an alarm to the central control panel when two PIR sensors detect identical motion signals. Furthermore, the time difference between the sensors' motion detection must not exceed 1.5 seconds.
You should test the sensor's functionality at the intended installation location! When choosing a location for MotionProtect Outdoor, consider the limited range of the radio signal.
With a signal strength of only one bar, we cannot guarantee the stable operation of the security system. Take possible measures to improve signal quality! At a minimum, moving the device 20 cm can significantly improve reception quality.
If, after moving, the device still has a low or unstable signal, use a ReX radio repeater.
Be careful when installing the mounting plate. Excessive force during its fixing can lead to deformation, and thus damage the sensor or make the device unstable. Only fix the mounting plate with the included mounting tools! Using other screws, such as large-diameter self-tapping screws, can damage the plate. Double-sided tape should not be used during installation, as the tape dries out over time and the sensor may fall off, which will prevent it from functioning properly.
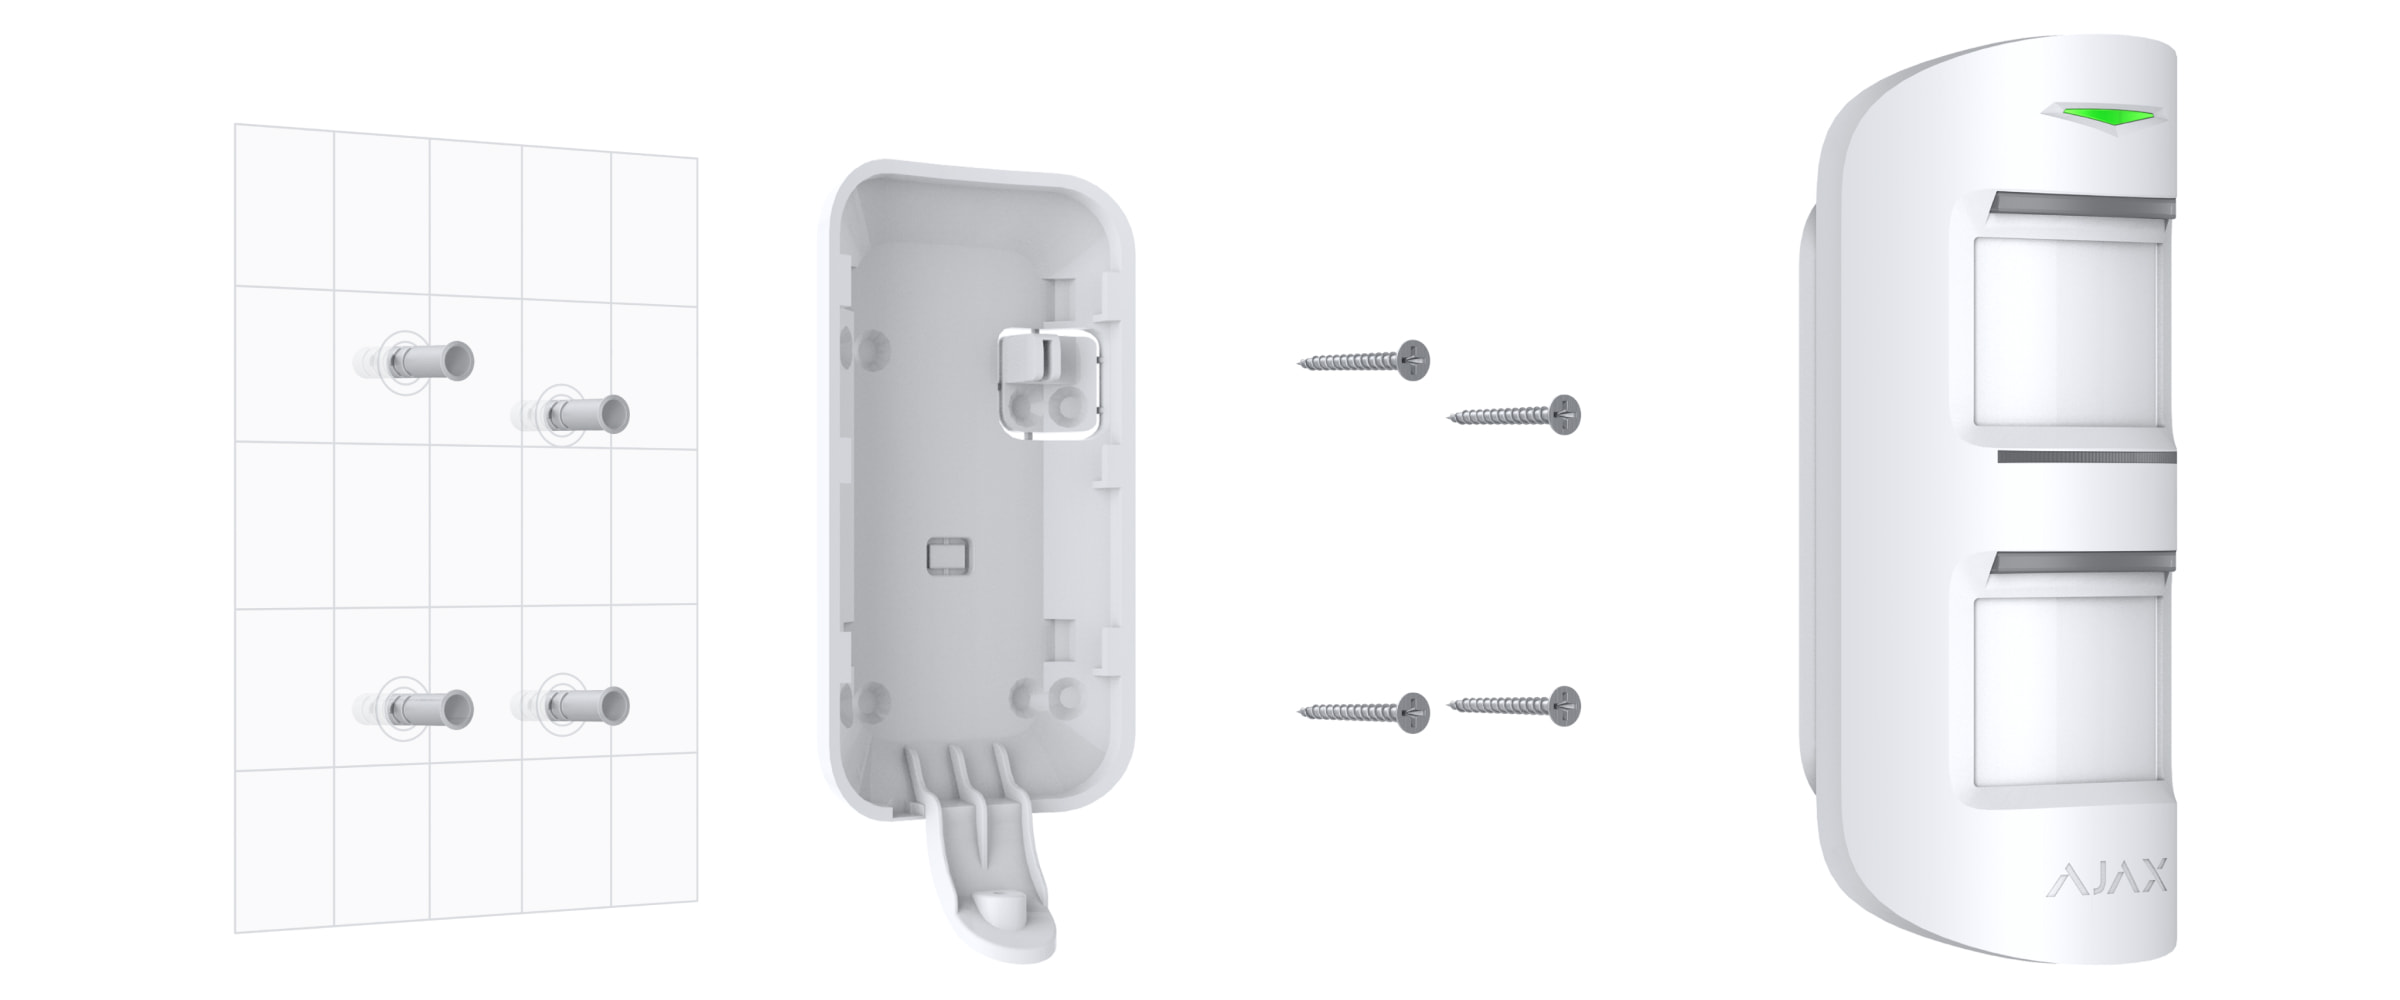
Sensor installation procedure
-
Temporarily attach the SmartBracket mounting plate to the surface to determine the optimal mounting position for the sensor. The sensor is installed at a height of 0.8 - 1.3 meters.
-
Select the desired sensor detection range (from 3 to 15 m) using the detection range slider on the sensor.
-
Install MotionProtect Outdoor onto your SmartBracket mounting board. Leave the sensor detection area (horizontal viewing angle - 90°) and ensure there is no movement within the sensor's viewing area to calibrate the Anti-Observation sensors.
Important! Calibration of the Anti-Masquerade sensors will automatically begin when the SmartBracket mounting plate is placed on the MotionProtect housing. Calibration lasts up to 30 seconds and is accompanied by flashing LEDs on the top and bottom of the sensor. -
Check the detection area and anti-obscuration features in the Ajax Security System application. If there is poor response to motion, select the appropriate sensitivity level and detection range, and check the sensor angle.
-
Secure the SmartBracket mounting plate to the surface using screws, install the sensor in the mounting plate, and wait for calibration to complete. Secure the sensor in the mounting plate using the provided screws.

-
Connect an external power source.
An external 5-28 V DC, 200 mA power supply can be connected to the sensor. After connecting the external power supply, you do not need to remove the supplied battery. The fully charged battery provides backup power for the device.
To connect an external power source:
-
Remove the sensor by unscrewing the screws and removing the back cover.
-
Remove the corresponding plug from the SmartBracket fastening board:

To disconnect the power cable from the back of the SmartBracket fastening board.
To pull the power cable from the bottom of the SmartBracket fastening board.
Run the external, unpowered power cable through the mounting bracket and plug on the back of the sensor housing.
Connect the cables to the terminal blocks, observing the polarity. Secure the wires with a clamp. 
3. Terminal block on the sensor board
4. Clip on the back of the case
Power on - in the MotionProtect outdoor sensor menu, the value of the External Source field changes to Connected.
Secure the back of the housing with screws, install the sensor, and wait until the calibration is complete.
Equipment maintenance
Clean the sensor housing of dust, cobwebs, and other contaminants as they appear. Use a soft, dry, suitable cloth to care for your device.
Do not use substances containing alcohol, acetone, gasoline, or other active solvents to clean the sensor. Wipe the lens carefully – scratches on the plastic can reduce sensor sensitivity.
The battery installed in the sensor provides up to 5 years of battery life (with a voting frequency of 3 minutes). When the sensor battery is depleted, the security system will send a corresponding notification, and the LED will light up and turn off when the sensor detects motion or triggers the anti-vandalism function.
The sensor has an integrated battery charging monitoring system. You will receive a notification as soon as the battery needs replacing completely.
Replace battery
Specifications
| Main sensor |
PIR sensors, 2 units. |
|
Horizontal view |
90° |
|
Motion detection range |
Adjustable, 3-15 m when installed at a height of 1 m. |
|
Anti-coverage protection |
Have |
|
Animal skip function |
Yes, it can reach up to 80 cm when the sensor is installed at a height of 1 m. |
|
Protection against false alarms |
Yes, algorithm analysis |
|
frequency range |
868.0 - 868.6 MHz or 868.7 - 869.2 MHz, depending on the sales region. |
|
Maximum radio signal strength |
Up to 20 mW |
|
Radio signal modulation |
Gfsk |
|
Radio range |
Up to 1700 m (in the absence of obstacles) |
|
Power |
2 x CR123A, 3V |
|
Battery life |
Up to 5 years |
|
External source |
5 - 28 V DC, 200 mA |
|
Usability |
Indoors and outdoors |
|
Protection against vandalism |
IP54 |
|
Protection against vandalism |
Have |
|
Operating temperature range |
From -25°C to +60°C |
|
Working humidity |
Up to 95% |
|
Size |
184 x 70 x 65 mm |
|
Weight |
322 g |
Complete set
-
MotionProtect Outdoor
-
CR123A batteries - 2 pieces. (Pre-installed)
-
Mounting kit
-
Brief guide
Guarantee
The warranty for products of "AJAX SYSTEMS MANUFACTURING" Limited Liability Company is valid for 2 years after purchase and does not apply to complete batteries.
If the device isn't working correctly, we recommend contacting support first – in half the cases, technical issues can be resolved remotely!