
GlassProtect - INSTRUCTIONS FOR USE
GlassProtect User Manual: GlassProtect is a wireless glass break sensor with an operating range of up to 9 meters. The alarm device is equipped with a highly sensitive microphone and a unique two-stage glass break sound detection system, minimizing the risk of false alarms.

GlassProtect User Guide
GlassProtect is a wireless glass break sensor with an operating range of up to 9 meters. The device is designed for indoor use and can operate continuously for up to 7 years thanks to its built-in battery. It also has a connection port for linking to an external sensor device.
GlassProtect operates within the Ajax security system by connecting via the Jewellery protocol to the Hub. The link range is up to 1000m in an unobstructed environment. Additionally, the device can be used with third-party central processing units via integrated uartBridge and ocBridge Plus modules.
The sensor device is set up via a mobile app for iOS and Android. Users will receive notifications about all events via push messages, SMS, and phone calls (if registered).
The Ajax security system is capable of operating independently, but users can still link the system to the main monitoring centers of security companies.
👉 Buy the GlassProtect glass break sensor now!
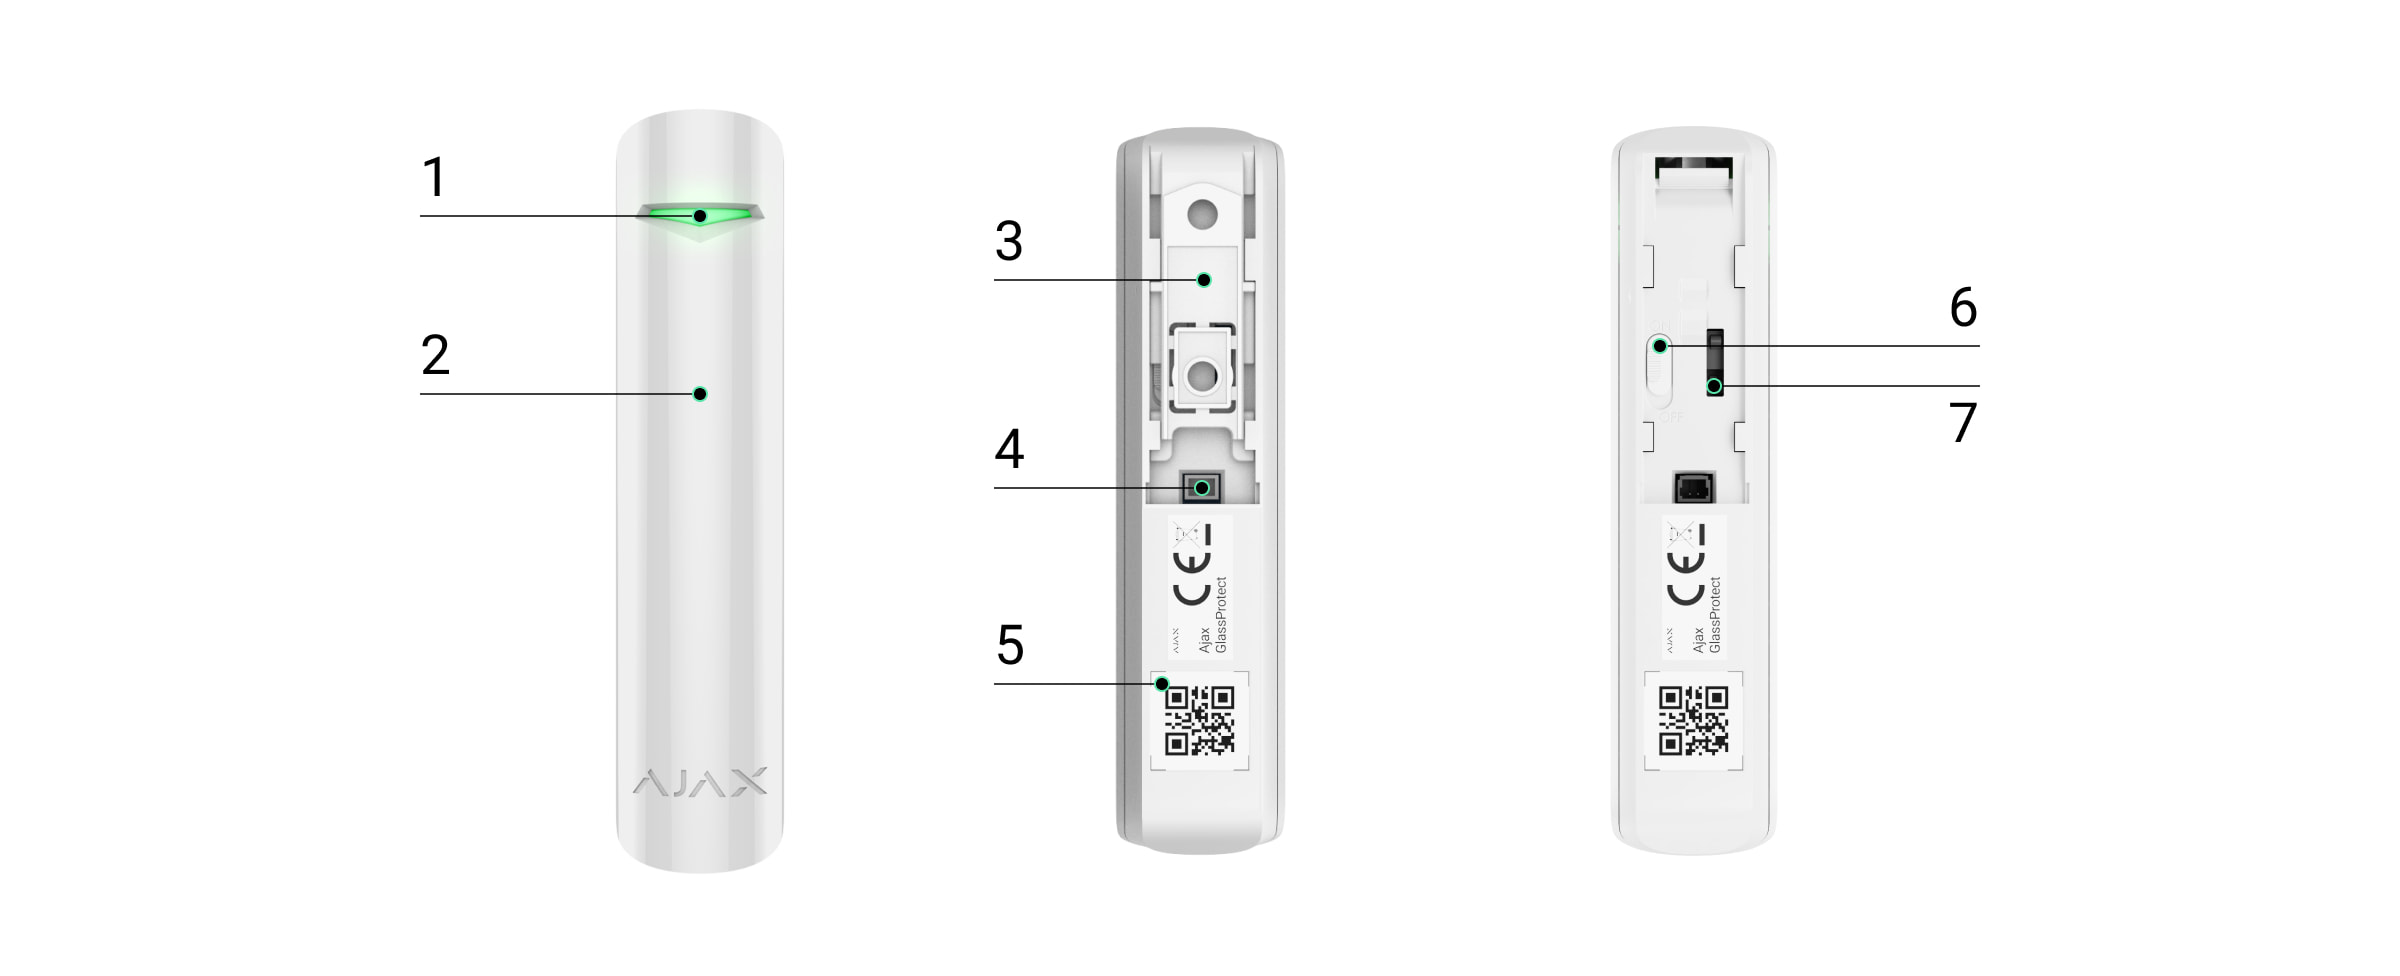
Features and details
-
Traffic lights
-
Microphone jack
-
SmartBracket mounting plate (The dotted line section is for vandalism protection against tampering when the device is removed or pulled from the mounting surface. Do not break it!)
-
Ports for connecting external sensor devices.
-
QR Code
-
Power switch
-
Vandal-proof switch
How GlassProtect works
GlassProtect is equipped with a highly sensitive electronic microphone, designed to distinguish the distinctive sounds of breaking glass, including the low-frequency impact sound and the high-frequency tinkling sound of cracking glass. Thanks to its two-stage glass break detection mechanism, the risk of false alarms is minimized.
|
⚠️ The GlassProtect device will not react to breakage if a film has been applied to the glass: shockproof, sunproof, decorative, or other. To detect breakage of this type of glass, we recommend using the DoorProtect Plus wireless open detector with shock and tilt sensors. |
Once activated, GlassProtect, in intrusion detection mode, will immediately transmit an alarm signal to the Hub, triggering the siren connected to the Hub and notifying the user and the security company.
Connect the device to the Ajax security system.
Connect the sensor to the hub.
Before starting the connection:
-
Install the Ajax app on your phone and follow the instructions to set up the Hub (Hub, Hub Plus).
-
Create a user account, add the Hub to the app, and create at least one room.
-
Open the Ajax application.
-
Turn on the hub and check your internet connection.
-
Check and make sure that the Hub is in the Disabled mode and not updating (check the status displayed in the application).
⚠️ Only users with administrator privileges can add new devices to the Hub.
How to connect a device to the Hub:
-
Select “Add device” in the Ajax app.
-
Name the motion sensor device, scan the QR code or manually enter the device's code into the app (the code is located under the lid and on the box), and select the Room for the device.

3. Select “Add” - the countdown will begin.
4. Turn the device's power button to "On". 
For the device to operate effectively and without interference, the sensor must be placed within the wireless coverage area of the Hub (with a protective object).
A request to connect to the Hub will be sent shortly after the device is powered on. If you are unable to connect to the Hub, try turning the device off and on again after 5 seconds.
Once connected, the sensor device will appear in the list of connected devices. The frequency of signal scanning will depend on the settings on the Hub, with a default of 36 seconds.
Connect the sensor device to third-party security systems.
To connect the sensor to third-party central processors, you can use the integrated Ajax uartBridge or Ajax ocBridge Plus module, following the instructions in the product manual.
Device states
Devices → GlassProtect
|
Category |
Content |
|
Temperature |
The temperature of the sensor device is measured on the microprocessor and updated continuously. |
|
Signal strength |
Signal strength of the connection between the Hub and the sensor device. |
|
Battery level |
The remaining battery level of the device is displayed in 25% increments. |
|
Lid |
The device's anti-tampering mechanism reacts when the device is removed from its installation location or the housing is damaged. |
|
Entry delay, seconds |
Entry delay |
|
Delay when exiting, seconds |
Delay when exiting |
|
Connect |
Connection status between the hub and the device |
|
Sensitivity |
Sensitivity of the glass break sensor |
|
Adverse reaction |
The status of the sensor device is linked to GlassProtect. |
|
Always on |
If activated, the sensor device will always be in the activated mode. |
|
Software |
The device's software version |
|
Device ID |
Unique device identification |
Set up the device.
Devices → GlassProtect → ⚙️
|
Function |
Content |
|
first line |
The device name can be customized. |
|
Room |
Select the room where you want to add the device. |
|
Sensitivity |
Select the sensitivity for the glass break sensor:
|
|
External links are available. |
If activated, the device will record alerts from linked devices. |
|
Always activated |
When activated, the device continuously records the opening and closing of doors. |
|
Entry delay, seconds |
Choose the entry delay |
|
Delay when exiting, seconds |
Choose the exit delay |
|
Lag in night mode |
Enable delay when setting night mode. |
|
Activated in night mode |
If selected, the device will switch to activation mode when you enter night mode. |
|
The alarm sounds when the glass breaks. |
If activated, the HomeSiren and StreetSiren sirens will be triggered upon the appearance of broken glass. |
|
Activate an alarm when an external connection is enabled. |
If enabled, the HomeSiren and StreetSiren sirens will activate upon the switching on of the connected device. |
|
Check the wave intensity. |
Switch the device to signal strength testing mode. |
|
Check for decline |
Switch the device to attenuation test mode (only available on devices with software version 3.5 or higher). |
|
User manual |
Open the device's user manual. |
|
Unconnect the device. |
Disconnect the device from the hub and delete all settings. |
Sensor device alerts
|
Event |
Signal |
Note |
|
Turn on the touch screen. |
Turn on the green light for about 1 second. |
|
|
The device is connected to Hub, ocBridge, and uartBridge. |
Flashes continuously for a few seconds. |
|
|
Anti-sabotage/anti-vandalism measures are activated. |
The light turns green for about 1 second. |
An alarm is sent every 5 seconds. |
|
The battery needs replacing. |
During an alarm, the device flashes a green light slowly. |
Instructions on how to replace the battery are clearly stated in the "Battery Replacement Guide" section. |
Check the sensor device.
The Ajax security system allows for testing to assess the functionality of connected devices.
The testing modes will not start immediately but after a 36-second cycle when using the default settings. The start time of the test depends on the sensor's scan cycle settings (see the "Jeweller" settings in the Hub's settings).
-
Check signal strength
-
Check the scan range.
-
Check for decline
After locating the detector and securing it with the included tape, test the detection area.
GlassProtect detectors are not sensitive to any explosions!
Check the glass break sensor.
Hit the glass hard with your fist without breaking it! If the detector microphone picks up a low-frequency sound, the LED will flash. Simulate a high-frequency glass-breaking sound for 1.5 seconds after the first hit – using a special musical instrument or by touching the glass with a metal object. After reading the sound, the detector will turn off the LED for one second.
To detect broken glass in activated mode, the sensor must pick up sounds in the following frequency order: low frequency (impact) followed by high frequency (glass breaking, cracking). Otherwise, the alarm will not be triggered.
Turn all normally operating devices in the room on/off: generator, air conditioner, etc. If a device is activated, it means the sensitivity is too high or the position of GlassProtect needs to be changed.
Use the sensitivity level at which the detector passes both phases of the test and does not react to any operating equipment in the room.
After setting the system to the active mode, proceed to test the functionality of GlassProtect.
Equipment installation
Choose the installation location.
In some cases, household activities can often trigger false alarms.
The optimal placement for GlassProtect depends on the distance between the device and the central hub, as well as the number of obstacles in between that can degrade signal quality: walls, floors, and large objects in the room.
⚠️ Check the signal strength in the settings.
If the signal strength is only one bar, Ajax won't guarantee that the system will work perfectly. Do everything you can to improve the signal quality! At the very least, try moving the device; even just 20 cm can significantly improve the connection quality.
If, after moving, the device still has a weak or unstable signal, use a ReX signal booster.
Do not install the device at:
-
Outdoor area
-
Keep away from metal objects or glass surfaces as this may affect the quality of the connection signal.
-
In areas where the temperature and humidity range of the device is exceeded.
-
In areas with strong airflow (fans, windows or doors open at all times)
-
Near alarms or other sources of sound.
GlassProtect can detect glass breakage from a distance of up to 9 meters. Its microphone must be positioned at an angle of no more than 90 degrees to the glass surface to be protected.
Make sure there are no obstructions in front of the device's microphone hole.
If the window is covered by thick curtains, place the detector between them and the window. For example, at the edge of the window frame. Otherwise, the curtains may drown out the sound of breaking glass and the detector will not be triggered.
Sensor installation guide
Before installation, make sure you have chosen a location that meets the requirements of this instruction manual.
-
Attach the smart wall panel to the surface using screws, employing at least two fixing points (one of which should be above the vandal-proof section). After selecting other mounting hardware, ensure that it does not damage or deform the wall panel.
Double-sided tape should only be used as a temporary fixation solution for equipment. The tape will dry out over time and could cause the equipment to fall, leading to malfunction or potentially damaging the equipment due to the fall.
-
Place the device on the mounting bracket. As soon as the device is secured on the SmartBracket, its LED will flash – this signals that the device's tamper-proof cover is closed. If the device's LED indicator does not light up after installation on the SmartBracket, check the tamper-proof status in the Ajax Security System app and adjust the tightness of the mounting bracket.
-
If the device is pulled away from the mounting surface or detached from the mounting bracket, you will receive a notification.
Connect to a wired sensor device.
A wired sensor with an NC connector can be linked to the GlassProtect device via the external port slot.

Ajax recommends that you install wired devices at a distance of no more than 1 meter – the greater the distance between the wires, the higher the risk of damage and reduced signal quality between devices.
To pull the cord out of the device, bend open the socket:

If an external sensor is linked, you will receive a notification.
Equipment maintenance and battery replacement.
You should regularly check the functionality of the Ajax security system.
Clean the machine body of dust, cobwebs, or other dirt. Use only a soft, dry cloth for maintenance.
Do not use cleaning agents containing alcohol, acetone, or gasoline to clean the equipment.
The built-in battery ensures automatic operation for up to 7 years (with the central hub querying every 5 minutes).
If a low battery is detected, the security system will send corresponding notifications, and the LED will light up and turn off if the detector detects any movement or if the tamperer is activated.
When the battery level reaches 10%, the system will immediately notify you that the battery needs replacing.
👉🏻 Instructions for replacing the battery
Technical specifications table
|
Sensor type |
Electromagnetic microphone |
|
Glass break detection range |
Up to 9 meters |
|
Coverage angle |
180° |
|
Protection against vandalism |
Have |
|
Bandwidth |
868.0 – 868.6 MHz or 868.7 – 869.2 MHz |
|
Maximum power |
Up to 20 mW |
|
Wireless module |
GFSK |
|
Link scope |
Up to 1,000 m (unobstructed view) |
|
External device connection port |
Yes, NC port |
|
Source |
1 CR123A battery, 3V |
|
Battery life |
Up to 7 years |
|
Operating temperature range |
For Ukraine and East African countries: From -10°C to +40°C Other places: From +5°C to +40°C |
|
Moisture tolerance |
Up to 75% |
|
Size |
Ø 20 x 90 mm |
|
Mass |
30 g |
The complete set includes
-
GlassProtect
-
CR123A battery (pre-installed)
-
External terminal clamp
-
Installation screw set
-
User manual
Guarantee
The product comes with a 2-year manufacturer's warranty.
If the device is not working as designed, please contact our technical support team before sending it in for warranty service – as over 50% of cases are simply issues with settings adjustments.