
HomeSiren User Guide
HomeSiren - USER MANUAL HomeSiren is an indoor alarm siren with a power output of up to 105 dB. The device can be installed quickly, is adorned with LED lights (additional LEDs can be connected), and boasts a battery life of up to 5 years.

HomeSiren - User Manual
HomeSiren is an indoor alarm siren with a power output of up to 105 dB. The device is quick to install, features LED lighting (additional LEDs can be connected), and boasts a battery life of up to 5 years.
HomeSiren operates within the Ajax security system by connecting to the Hub via the Jeweller protocol. The connection range is up to 2000m in an unobstructed environment.
The alarm siren can be set up via a mobile app on iOS and Android.
The device only works with the Hub; it is not compatible with the Ajax uartBridge and Ajax ocBridge Plus modules.
The Ajax security system can operate independently, but users can also link it to a security company's monitoring center.
👉 Buy the HomeSiren indoor alarm now!
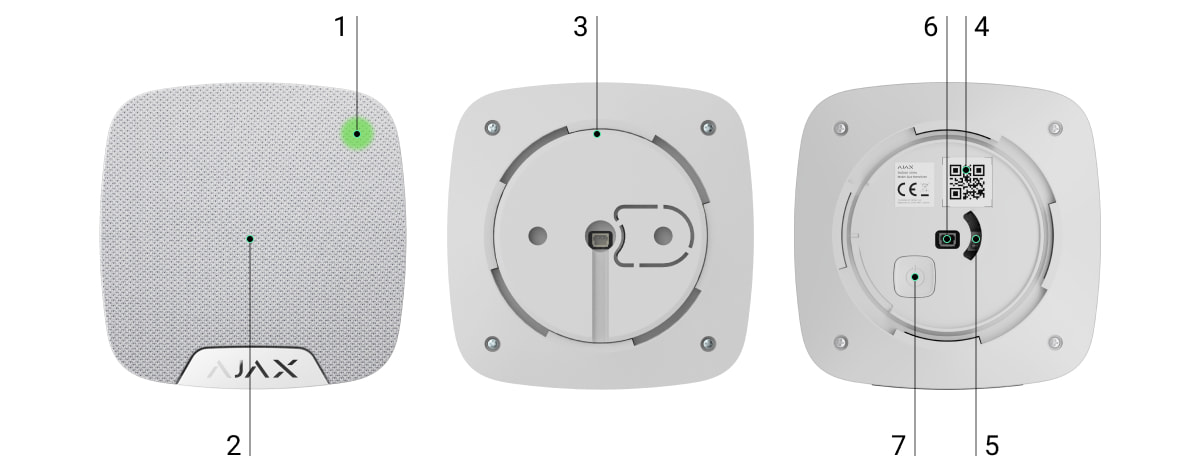
Features and details
-
Indicator lights
-
The loudspeaker is covered with a cloth.
-
SmartBracket smart hanging board (The dotted lines are for vandal-proof protection)
-
QR Code
-
Vandal-proof switch
-
External light alarm device connection port
-
On/off button
How HomeSiren works
Alarm sirens significantly improve the effectiveness of security systems, serving as the most effective means of dealing with intrusion. With their high volume, these alarm signals are sufficient to scare away intruders.
The device is equipped with a loud chime – the sound of the alarm siren can be heard from a distance. If installed correctly, the device will be difficult to remove and the activated alarm siren will be difficult to deactivate: the body is robust, the power supply is automatic, and the on/off switch will be blocked when the security system is in protection mode.
Connect the siren to the Hub.
The HomeSiren alarm system only works with the Ajax security system; up to 10 alarms can be linked to one system simultaneously.
Before starting the connection:
-
Install the Ajax app on your phone and follow the instructions to set up the Hub (Hub, Hub Plus).
-
Create a user account, add the Hub to the app, and create at least one room.
-
Open the Ajax application.
-
Turn on the hub and check your internet connection.
-
Check and make sure that the Hub is in the Disabled mode and not updating (check the status displayed in the application).
⚠️ Only users with administrator privileges can add new devices to the Hub.
Devices can only be added when the system is in Deactivated mode.
-
Open a room in the app and select "Add device".
-
Name the device, scan the QR code or manually enter the device's code number into the app (the code number is located under the lid and on the box), and select a Room for the device.

3. Select “Add” — the countdown begins.
4. Turn on the device. 
For the device to function effectively and without interference, the sensor must be placed within the wireless coverage area of the Hub (with a protective object).
A request to connect to the Hub will be sent shortly after the device is powered on. If you are unable to connect to the Hub, try turning the device off and on again after 5 seconds.
If the device is already linked to a different Hub, power off the HomeSiren and repeat the device adding process as usual.
If the connection to the Ajax Hub fails, the alarm will go off after 6 seconds. You can repeat the connection attempt later. To retry the connection, you do not need to turn off the device.
The siren connected to the hub will appear in the list of hub devices in the application. The siren status in the list updates depending on the device query time set in the hub settings, with the default value being 36 seconds.
Device states
Devices → HomeSiren
|
Category |
Meaning |
|
Temperature |
The temperature of the device. Measured on the processor and changes gradually. |
|
Signal strength |
Signal strength of the connection between the Hub and the sensor device. |
|
Battery level |
The remaining battery level of the device is displayed in 25% increments. |
|
Lid |
The device's anti-tampering mechanism reacts when the device is removed from its installation location or the housing is damaged. |
|
Alarm volume |
Alarm volume level |
|
Alarm duration |
Duration of the alarm |
|
Display activation mode |
If activated, the LED will flash once every 3 seconds when the system is in the activated state. |
|
A "Beep" sound will be emitted when entering Activation/Deactivation mode. |
If activated, the alarm will signal with an LED light and a short beep when the system is placed in Activate/Deactivate mode. |
|
Latency |
If activated, the alarm will sound with a delay. |
|
Software |
The device's software version |
|
Device ID |
Unique device identification |
Set up the device.
Devices → HomeSiren → ⚙️
|
Customize |
Content |
|
first line |
The device name can be customized. |
|
Room |
Select a room where the device is actually installed. |
|
Alarm volume |
Alarm volume: Loud, Normal, Low |
|
Alarm duration |
Alarm duration: from 3 to 180 seconds per alarm. |
|
Indicates activation mode |
If activated, the LED will flash once every 3 seconds when the system is in activation mode. |
|
A "Beep" sound will be emitted when entering Activation/Deactivation mode. |
If activated, the alarm will signal with an LED light and a short beep when the system is placed in Activate/Deactivate mode. |
|
Latency |
If activated, the alarm will sound with a delay (only available on devices with software version 3.50 or higher). |
|
Check the volume. |
Start the alarm to test. |
|
Check the wave intensity. |
Switch the device to signal strength testing mode. |
|
Check for decline |
Switch the keypad to signal attenuation test mode (only available on devices with software version 3.50 or higher). |
|
User manual |
Open the device's user manual. |
|
Unconnect the device. |
Disconnect the device from the hub and delete all settings. |
Notification signal
|
Event |
Content |
|
Alarm |
An audible warning sound will be emitted (duration depends on the settings) and all LEDs will light up. |
|
Turn the device on. |
The LED lights up once. |
|
Turn off the device |
The LED lights up for 1 second and then flashes 3 times. |
|
Registration error |
The LED light turns on and off, the device powers off. |
|
The system is set to activation mode. |
The LED flashes once and emits an audible alert. |
|
The system is set to Deactivation mode. |
The LED flashes twice and emits two beeps. |
|
Speaker in activated mode |
The LED flashes once every 3 seconds. |
|
Low battery |
The LED lights up and down slowly when the system is Activated/Deactivated (if the indicator is activated), the tamperer is triggered, or an alert is given. |
Check functionality
The Ajax security system allows for testing to assess the functionality of connected devices.
The testing modes will not start immediately but after a 36-second cycle when using the default settings. The start time of the test depends on the scanning cycle settings of the sensor device (see the “Jeweller” settings in the Hub settings).
-
Check the volume.
Equipment installation location
The installation location of the device is determined by the distance between the device and the hub; the presence of obstacles between the devices will affect radio wave transmission: walls, concrete floors, large objects placed in the room.
Check the signal strength displayed in the application.
If the signal strength is only one bar, Ajax won't guarantee that the system will work perfectly. Do everything you can to improve the signal quality! At the very least, try moving the device; even just 20 cm can significantly improve the connection quality.
If, after moving, the device still has a weak or unstable signal, use a ReX signal booster.
The recommended installation height is 2.5 meters or more. This helps place the device out of reach of intruders.
Install alarm systems.
Before installation, make sure you have chosen a location that meets the requirements of this instruction manual.
-
Attach the smart wall panel to the surface using screws, employing at least two fixing points (one of which should be above the vandal-proof section). After selecting other mounting hardware, ensure that it does not damage or deform the wall panel.

Double-sided tape should only be used as a temporary fixation solution for equipment. The tape will dry out over time and could cause the equipment to fall, leading to malfunction or damage from the fall. -
Mount the alarm siren onto the SmartBracket and rotate it clockwise. After securing the device to the mounting bracket, the vandal-proof mode will be indicated by flashing the LED once.
If the LED light does not flash after mounting the SmartBracket, check the vandal-proof mode status in the Ajax Security System app and readjust the tightness of the mounting bracket.
You will receive notifications if any attempts to vandalize the device occur.
Do not install speakers in:
-
Outdoor area
-
In places where the alarm sound might be obstructed (inside furniture, behind thick curtains, etc.)
-
Keep it away from metal objects or bed surfaces as this will affect the connection quality.
-
Exceeding the device's operating temperature and humidity range.
The external LEDs are connected to the HomeSiren in parallel with the device's built-in LEDs and completely replicate the device's instructions.
To connect, use the contact points on the back of the siren body and observe the polarity during connection.
The black terminal wire is the "+" contact.
Output voltage: 3 V, 10 mA.
Maintain the alarm siren and replace the battery.
You should regularly check the functionality of the Ajax security system.
Clean the machine body of dust, cobwebs, or other dirt. Use only a soft, dry cloth for maintenance.
Do not use cleaning agents containing alcohol, acetone, or gasoline to clean the equipment.
The built-in battery can ensure the device operates for up to 5 years (with a communication frequency with the Hub of 1 minute/time) or provides continuous alarm for 6 hours. If the battery is depleted, the system will send a notification to the user, and the LED will slowly light up and turn off when the activation mode is enabled.
👉🏻 Instructions for replacing the battery
Technical specifications table
|
Type of alert |
Sound and LED lights |
|
Warning volume |
81 - 105 dB at a distance of 1 m (adjustable) |
|
Operating frequency of the alarm speaker |
3.4 ± 0.5 kHz |
|
Protection against vandalism |
Have |
|
Bandwidth |
868.0 – 868.6 MHz or 868.7 – 869.2 MHz |
|
Maximum power |
25 mW |
|
Wireless module |
GFSK |
|
Wave range |
Up to 2,000 m (unobstructed view) |
|
Source |
2 x CR123A, 3V batteries |
|
Battery life |
Up to 5 years |
|
External LED connector port |
Yes (3V, 10mA power source) |
|
Protect the device body. |
IP50 |
|
Operating temperature |
From -10°C to +40°C |
|
Operating humidity |
Up to 75% |
|
Size |
75 x 76 x 27 mm |
|
Mass |
97 g |
The complete set includes
-
CR123A battery (pre-installed) - 2 batteries
-
Installation screw set
-
User manual
Guarantee
The product comes with a 2-year manufacturer's warranty.
If the device is not working as designed, please contact our technical support team before sending it in for warranty service – as over 50% of cases are simply issues with settings adjustments.