
KeyPad - User Manual
KEYPAD USER GUIDE The KeyPad is a wireless touch keypad that controls the Ajax system. It can activate and deactivate a room from security mode, is protected against code cracking, and supports "Stealth Alarm".

KEYPAD USER GUIDE
The KeyPad is a wireless touch keypad that controls the Ajax security system. It can activate and deactivate a room from security mode, display system status, is protected against code cracking, and supports a "silent alarm" when the user is forced to enter a password.
The keypad only works with Ajax security systems (it cannot be used with other security systems) by connecting to the Hub device via the Jeweller protocol. The connection range is up to 1700 meters in an unobstructed environment.
The device only works with the Hub; it is not compatible with the Ajax uartBridge and Ajax ocBridge Plus modules.
The device can be customized through an app on iOS and Android.
👉 Buy KeyPad - Touchscreen Control Keypad now!
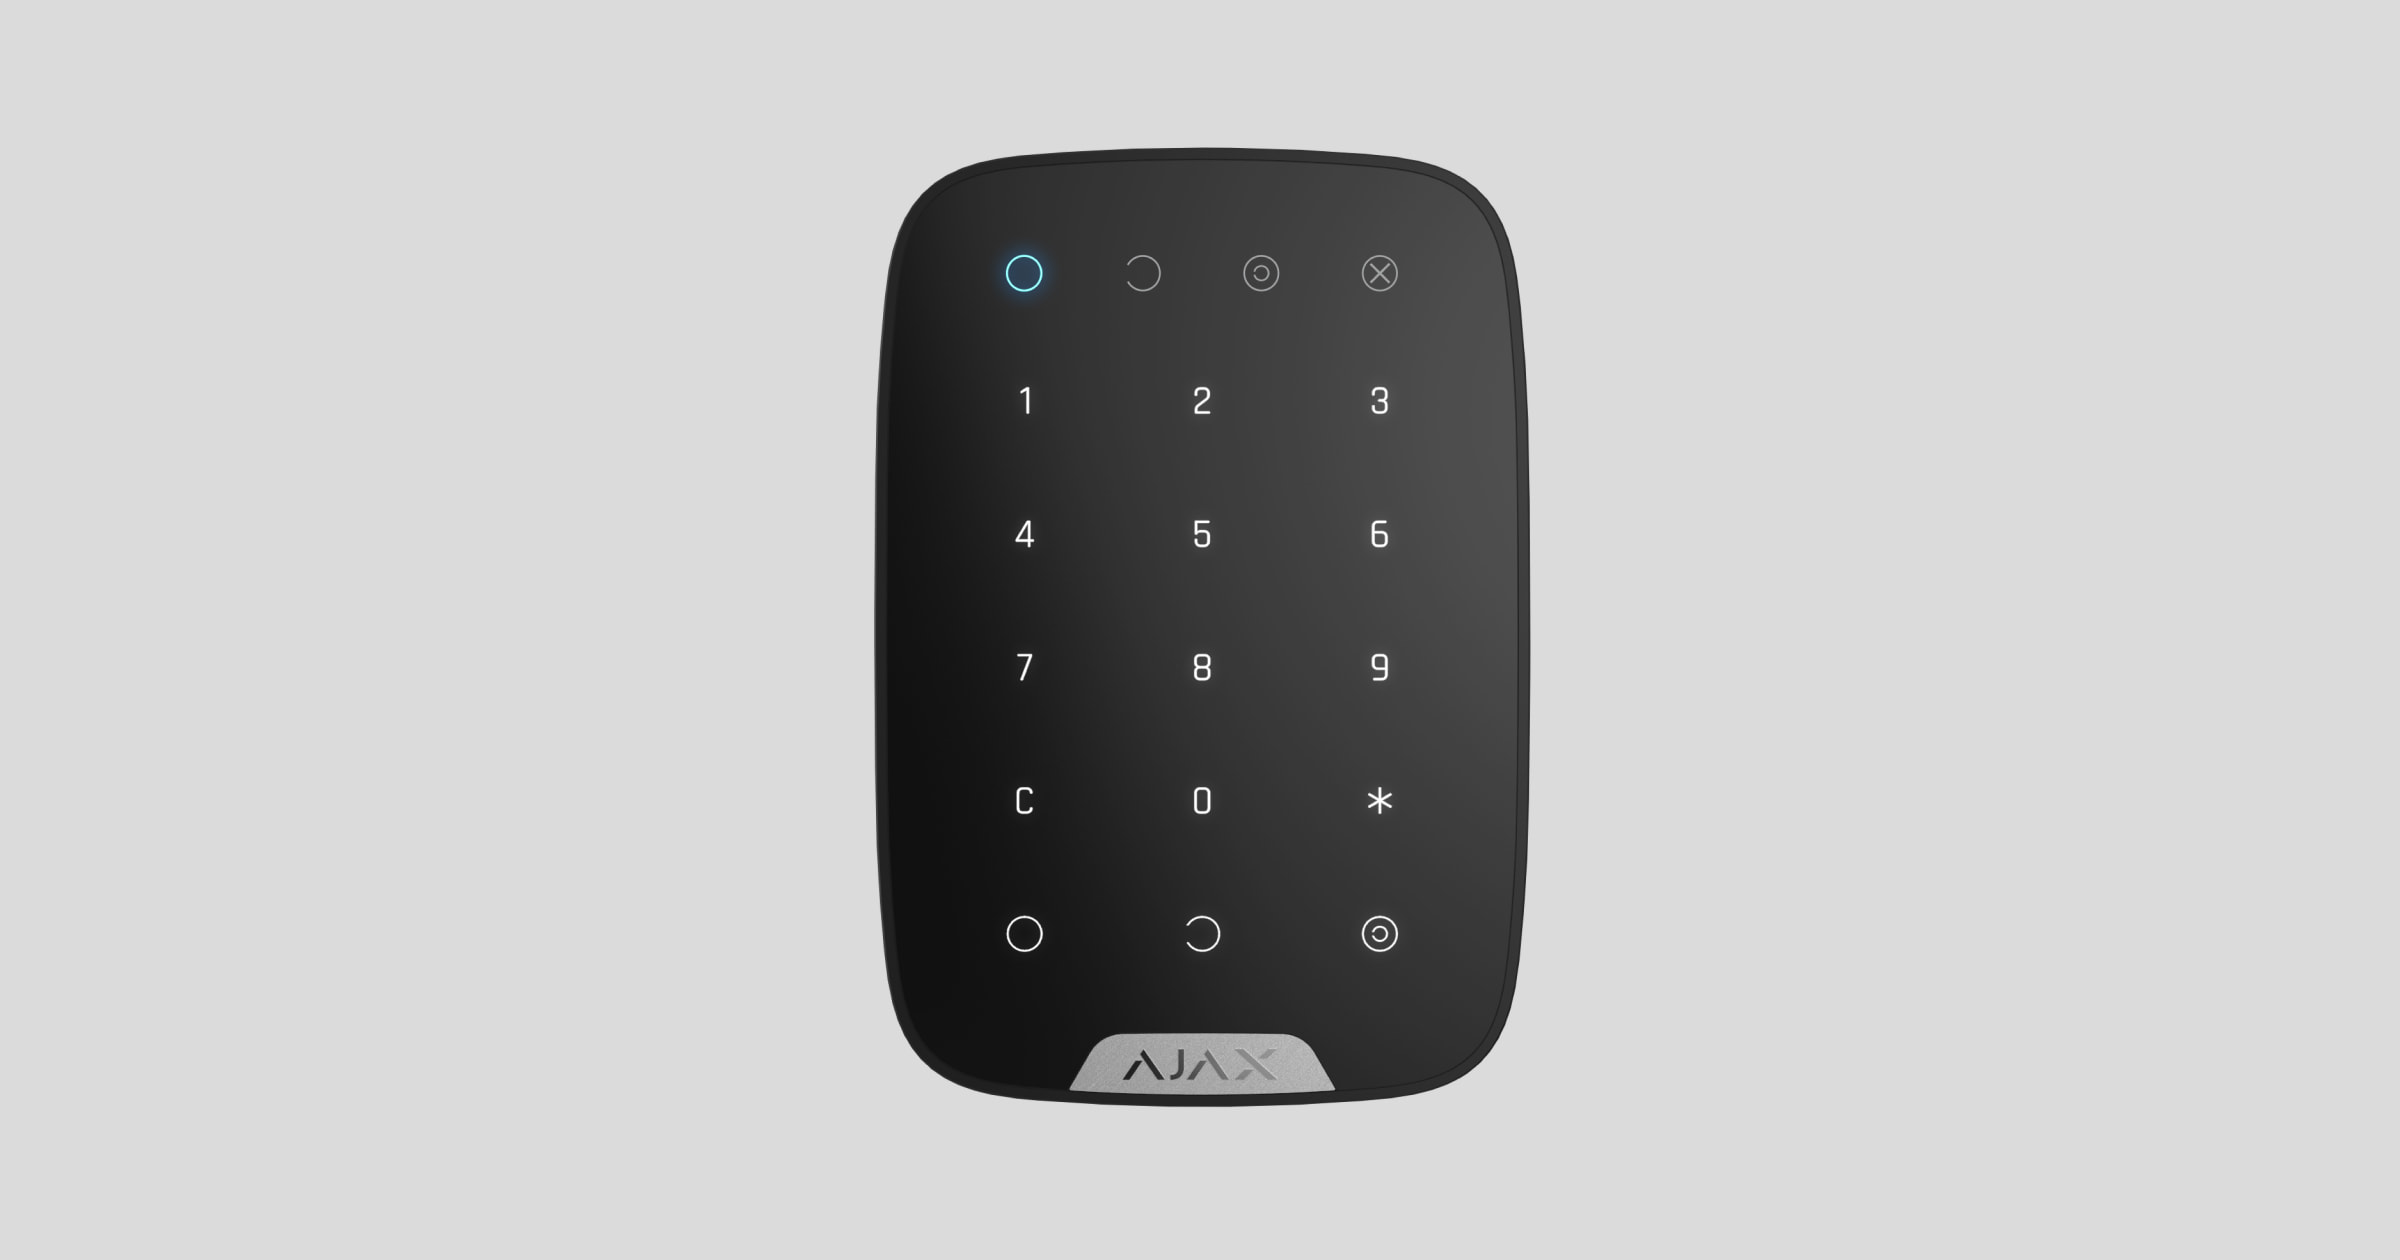
Features and details
-
Activation signal
-
Deactivation signal
-
Night mode indicator
-
Device malfunction indicator
-
Touchscreen display panel
-
Delete button
-
Function button
-
Activation button
-
Deactivate button
-
Night mode activation button
-
Vandal-proof switch
-
On/Off button
-
QR Code
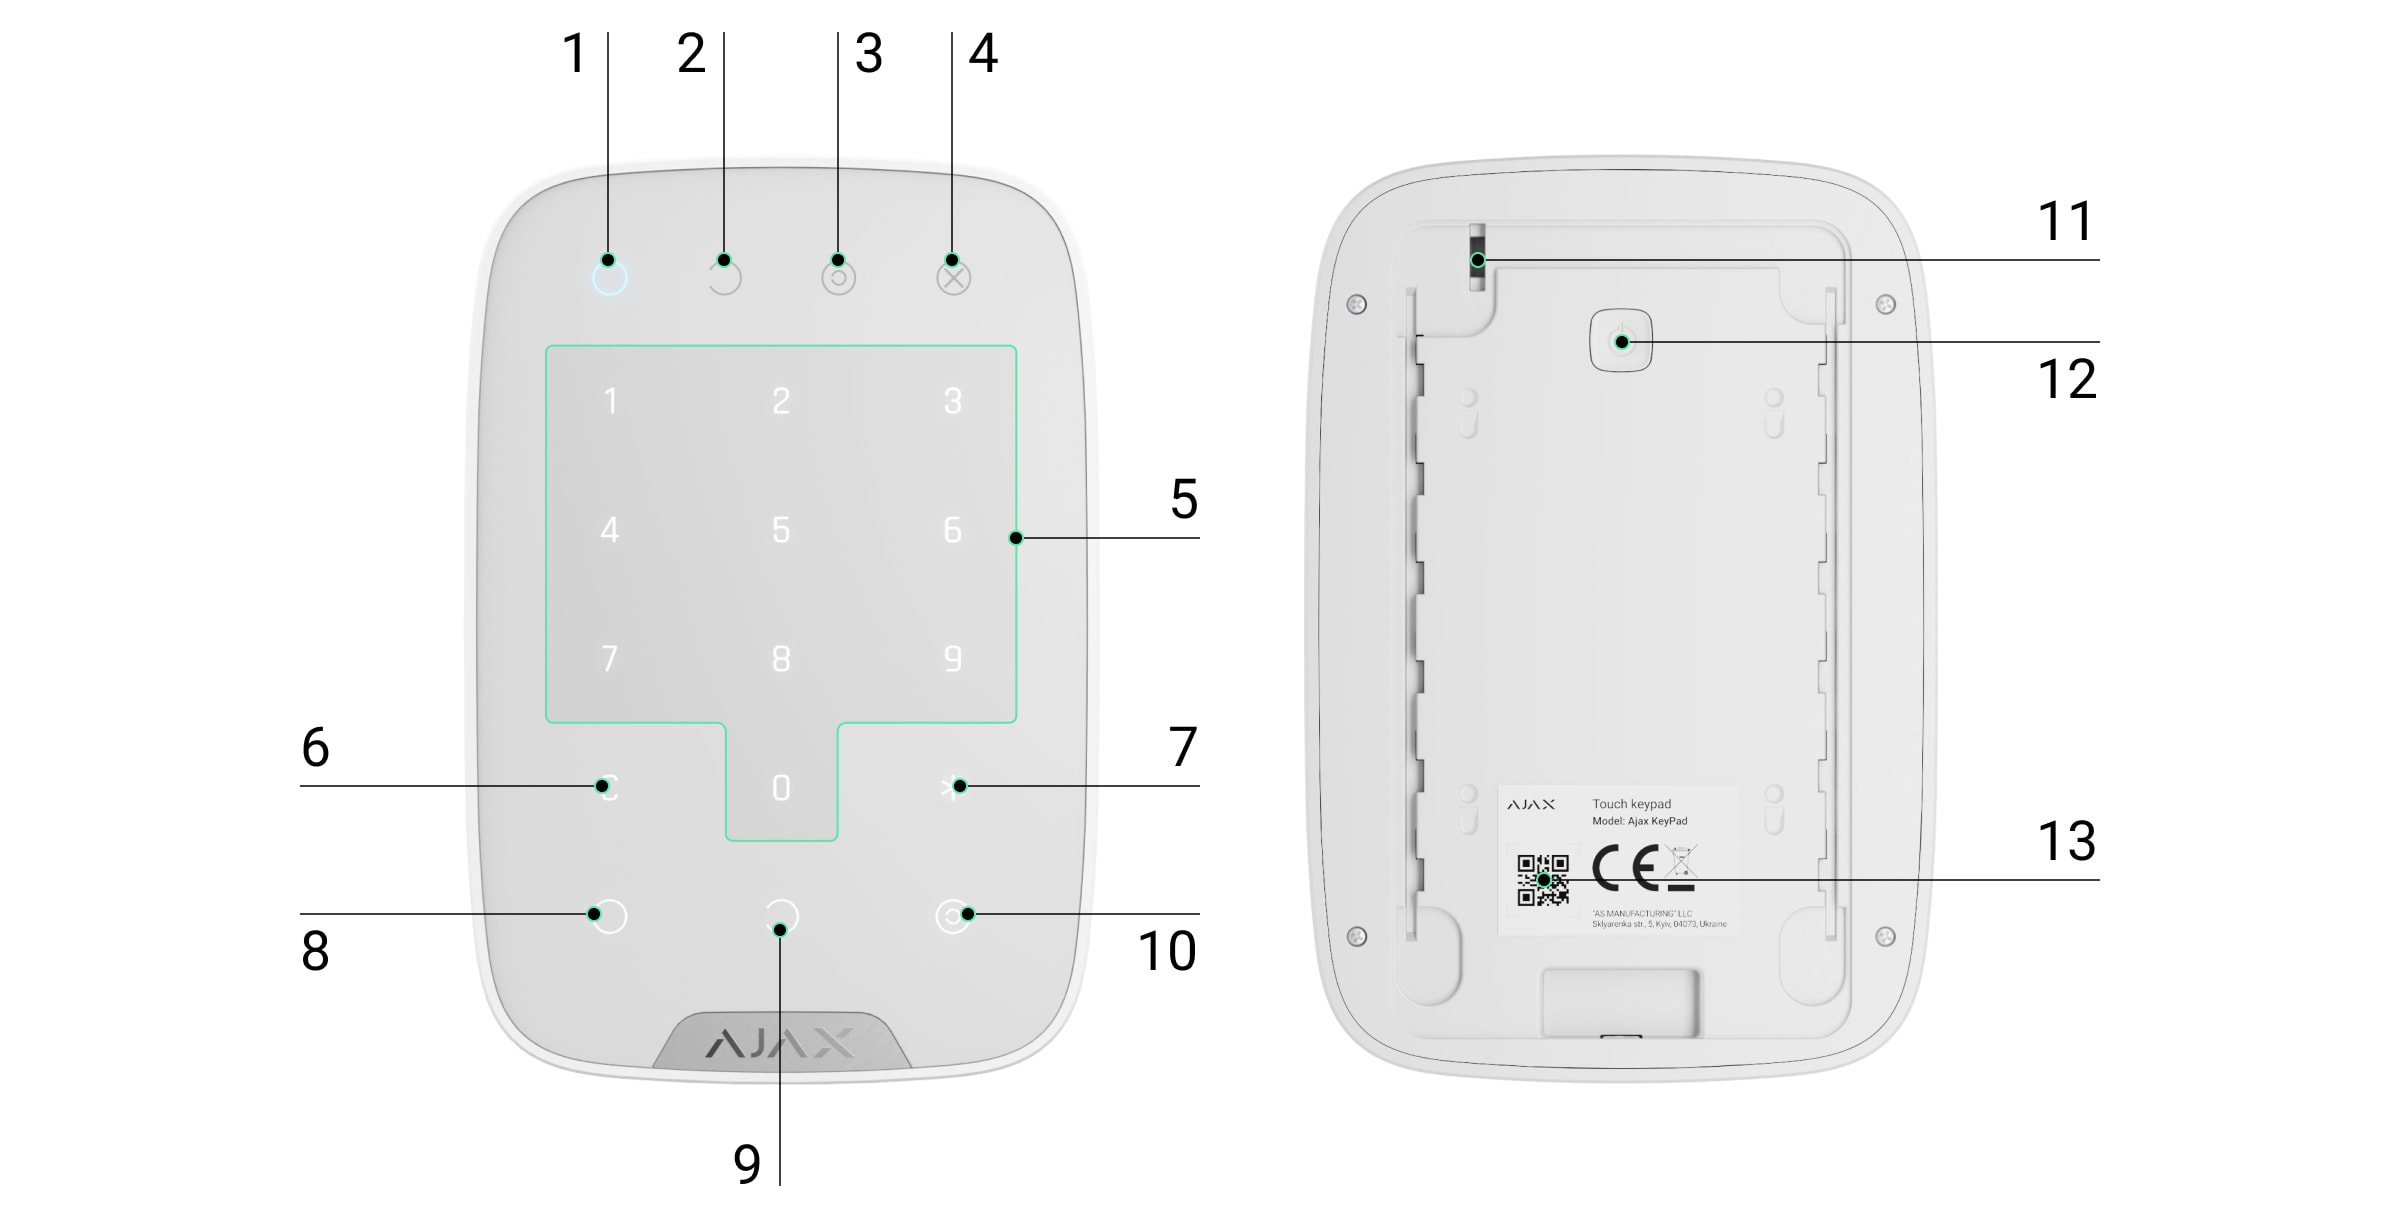
To remove the SmartBracket, slide the back cover down (the dotted line cutout is for the vandal-proof alarm in case the device is removed from the mounting surface).
The operating principle of a keypad.
The keypad is a touch-sensitive keyboard used to control the system.
A keypad is a fixed keyboard located inside a room. It allows for system setup, enabling protection via digital code or button press, activating night mode, disabling the room, and notifying the private security company of the forced shutdown of the security system (without disclosing user information).
The keypad is equipped with light indicators that signal the security system status, any issues with the detectors, or communication interruptions with the control panel. The large, backlit touch buttons allow for touch activation; if the device is activated, the code can be entered without external lighting. The built-in battery provides up to two years of operation.
Device states
Hub -> Keypad
|
Category |
Meaning |
|
Temperature |
The temperature of the device. Measured on the processor and changes gradually. |
|
Signal strength |
Signal strength of the connection between the Hub and the sensor device. |
|
Battery level |
The remaining battery level of the device is displayed in 25% increments. |
|
Lid |
The device's anti-tampering mechanism reacts when the device is removed from its installation location or the housing is damaged. |
|
Connect |
Connection status between the hub and the device |
|
Software |
The device's software version |
|
Device ID |
Unique device identification |
Customize your device.
Hub -> Keypad -> Settings
|
Customize |
Content |
|
first line |
The device name can be customized. |
|
Room |
Select a room where the device is actually installed. |
|
Types of access |
Choose the type of passcode to activate/deactivate the system:
|
|
Function button |
Select the function for the function button.
|
|
Activation without a password is possible. |
Allows the system to be activated by pressing the activation button without entering a code. |
|
Automatically locks when the wrong password is entered. |
If enabled, after entering the wrong passcode three times, the keyboard will be locked for a period of time specified in the settings. During this time, you cannot deactivate the system using the Keypad. |
|
Automatic time over (minutes) |
The keyboard lock time when an incorrect password is entered. |
|
Code |
Choose a Keypad password. |
|
Hidden alarm code |
Choose a hidden alarm password. |
|
Brightness |
Keypad backlight brightness |
|
Volume |
The volume of the sound feedback from the Keypad |
|
Check the wave intensity. |
Switch the device to signal strength testing mode. |
|
Check for decline |
Switch the keypad to signal attenuation test mode (only available on devices with software version 3.50 or higher). |
|
User manual |
Open the device's user manual. |
|
Unconnect the device. |
Disconnect the device from the hub and delete all settings. |
You can use a single password for everyone, or each user can have their own unique password.
To set up a private password:
-
Go to account settings (Hub → User settings → Your account settings)
-
Select Access Password Settings (you can find the user ID information in this menu).
-
Set your personal password and secret password.
Each user can set their own password!
To control the system using a personal password:
-
Enter User ID*Personal Password → Press Activate/Deactivate button
To control a specific group:
-
Enter User ID*Personal Password*Group ID → Press Activate/Deactivate button
Keypad activity notification
When the keypad is active, the LEDs will light up according to the operating mode of the security system.
Displays the current system status: Activated / Deactivated / Night Mode.
The information will be updated even if the system state is changed by other control methods - applications or the SpaceControl key. The state will be updated when the Keypad device is woken up by touch.
|
Event |
Meaning |
|
LED (X) flashing |
Error messages may appear in the Ajax Security System, or if the keyboard cannot connect to the hub. You can check the nature of the error in the Ajax Security System application. |
|
Press a touch button. |
Short tone |
|
The system is set to activation mode. |
A short beep sounds, and the "Activate" / "Night Mode" LED lights up. |
|
The system has been deactivated. |
Two short beeps, the "Deactivate" LED lights up. |
|
Incorrect password entered. |
The alarm sounds continuously, and the keyboard backlight illuminates three times while the alarm is active. |
|
The Hub refused to put the device into activation mode (possibly because a window is open). |
A long beep sounds, and the current status light flashes 3 times. |
|
A problem occurs when the system is in activation mode (such as losing connection with a device). |
A long beep sounds, and the "Error" light flashes three times. |
|
The Hub is not responding to control commands - no connection. |
The beeping sound is long, and the "Error" light illuminates continuously during the beeping sound. |
|
The keypad is locked due to multiple incorrect code entries. |
A long beep sounds, and the Activate/Deactivate/Night Mode status lights illuminate simultaneously. |
|
Low battery |
After entering the correct code and switching the system to Activate/Deactivate mode, the keypad will slowly flash the "Error" light. At that point, the keyboard will be locked. When attempting to switch on the keyboard with a depleted battery, it will emit a long audible signal, the "Error" light will flash slowly, and then the keyboard will turn off. |
Connect the Keypad to the Ajax security system.
Before starting the connection:
-
Install the Ajax app on your phone and follow the instructions to set up the Hub (Hub, Hub Plus).
-
Create a user account, add the Hub to the app, and create at least one room.
-
Open the Ajax application.
-
Turn on the hub and check your internet connection.
-
Check and make sure that the Hub is in the Disabled mode and not updating (check the status displayed in the application).
⚠️ Only users with administrator privileges can add new devices to the Hub.
Devices can only be added when the system is in Deactivated mode.
-
Open a room in the app and select "Add device".
-
Name the device, scan the QR code or manually enter the device's code number into the app (the code number is located under the lid and on the box), and select a Room for the device.
-
When the Hub starts scanning for devices and counting down, power on the Keypad by pressing and holding the On/Off button for 3 seconds - the LED will flash once.
For the device to function effectively and without interference, the sensor must be placed within the wireless coverage area of the Hub (with a protective object).
A request to connect to the Hub will be sent shortly after the device is powered on. If you are unable to connect to the Hub, try turning the device off and on again after 5 seconds.
Once connected, the touch keyboard will appear in the list of connected devices. The default password for the Keypad is 123456, and the hidden password is 123457.
Choose the location for installing the keypad.
The installation location of the device is determined by the distance between the device and the hub; the presence of obstacles between the devices will affect radio wave transmission: walls, concrete floors, large objects placed in the room.
Do not install the keypad:
-
Located near radio transmission devices, including devices operating on 2G/3G/4G cell phone signals, Wi-Fi routers, signal boosters, radio stations, as well as near the Ajax Hub (because the Hub uses the GSM network).
-
The area is close to the power lines.
-
Being near metal objects or glass surfaces (may reduce connection quality)
-
Outdoor area.
-
In rooms where the temperature and humidity exceed the device's operating limits.
Check the signal strength displayed in the application.
During testing, the signal strength level can be clearly seen on the application as well as on the Keypad - blue LEDs O (Activated), C (Deactivated) and (c) (Night Mode), and red X (Error).
If the signal strength is only one bar, Ajax won't guarantee that the system will work perfectly. Do everything you can to improve the signal quality! At the very least, try moving the device; even just 20 cm can significantly improve the connection quality.
If, after moving, the device still has a weak or unstable signal, use a ReX signal booster.
The KeyPad's touch keyboard is designed to function when the device is mounted on a flat surface. If you hold the keyboard in your hand, we cannot guarantee that the device will function correctly.
Keypad features
To activate the Keypad, touch the touch panel – the buttons will light up when activated and an audible alert will sound.
If the battery is low, the backlight will be adjusted to the minimum brightness level, ignoring the settings option.
If you don't touch the keys for 4 seconds, the Keypad will dim the keyboard brightness, and after 12 seconds the device will enter sleep mode.
When the keypad goes into sleep mode, it will delete any previously unfinished typing commands!
The keypad allows the use of codes between 4 and 6 characters long. The entered code will be sent to the Hub after pressing the keys: O (Activate), C (Deactivate), and (c) (Night Mode). If you enter the wrong code, use the C (Reset) key to clear it.
If you enter the wrong password three times within 30 minutes, the keypad will be locked for the duration specified in the settings. The Hub will not accept any further password attempts and will notify the user of repeated incorrect password entries. The keypad will automatically unlock after the time limit expires, or it can be manually unlocked by the administrator.
The keypad also supports activating the system without entering a password; simply press the O (Activate) key. This feature is disabled by default.
If you press the * (Function) key without entering a password, the * command will be sent to the Hub and the function configured in the application for the key will be executed.
The KeyPad can notify the security company when the system is deactivated due to user incapacitation – a secret code is used. Unlike the emergency alarm button on the SpaceControl key, when the secret code is entered, the alarm will not sound, but the security company and other users will be notified of the incident.
Installing the Keypad
Before installation, make sure you have chosen a location that meets the requirements of this instruction manual.
The keypad should be mounted on a flat, vertical surface.
-
Attach the smart wall panel to the surface using screws, employing at least two fixing points (one of which should be above the vandal-proof section). After selecting other mounting hardware, ensure that it does not damage or deform the wall panel.
Double-sided tape should only be used as a temporary fixation solution for equipment. The tape will dry out over time and could cause the equipment to fall, leading to malfunction or potentially damaging the equipment due to the fall. -
Place the device on the mounting plate and secure it with screws on the bottom side.
As soon as the Keypad is secured onto the SmartBracket, it will flash the X (Error) LED to indicate that anti-tampering mode has been activated.
If the X (Error) LED on the Keypad does not flash after mounting it onto the SmartBracket, check the status of the anti-vandalism mode in the Ajax Security System app and readjust the tightness of the mounting bracket.
If the keypad is pulled away from its mounting surface, you will receive a notification.
Check functionality
The Ajax security system allows for testing to assess the functionality of connected devices.
The testing modes will not start immediately but after a 36-second cycle when using the default settings. The start time of the test depends on the scanning cycle settings of the sensor device (see the “Jeweller” settings in the Hub settings).
Keypad maintenance and battery replacement.
Regularly check the functionality of your keypad.
The built-in battery can ensure up to 2 years of operation (with a query frequency [Jeweller protocol link to the central processor] in 3-minute cycles). If the keyboard battery is low, the security system will send relevant notifications and the "Error" indicator light will turn on and off after each successful password entry.
👉🏻 Instructions for replacing the battery
The complete set includes
-
KeyPad
-
AAA batteries (pre-installed) - 4 batteries
-
Installation screw set
-
User manual
Technical specifications table
|
Touch type |
Touch |
|
Protection against code cracking |
Have |
|
Protection against vandalism |
Have |
|
Bandwidth |
868.0 – 868.6 MHz or 868.7 – 869.2 MHz |
|
Maximum power |
Up to 20 mW |
|
Radio wave module |
GFSK |
|
Connection range |
Up to 1,700 m (unobstructed view) |
|
Source |
4 x AAA batteries |
|
Voltage |
3V |
|
Battery capacity |
Up to 2 years |
|
Operating temperature range |
From -10°C to +40°C |
|
Operating humidity |
Up to 75% |
|
Size |
150 x 103 x 14 mm |
|
Mass |
197 g |
Guarantee
The product comes with a 2-year manufacturer's warranty.
If the device is not working as designed, please contact our technical support department before sending it in for warranty service – as over 50% of cases are simply issues with settings.