
MotionProtect/MotionProtect Plus - User Manual
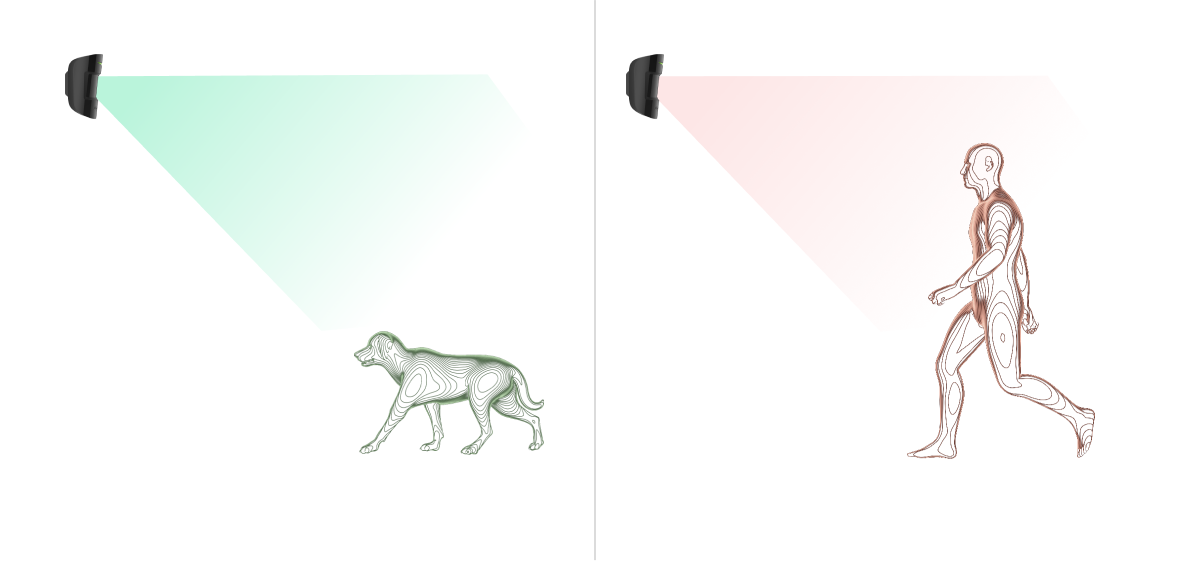
INSTRUCTIONS FOR USING MotionProtect / MotionProtect Plus MotionProtect is an indoor motion sensor that is pet-immune but accurately detects the presence of humans from the very first step.

INSTRUCTIONS FOR USING MotionProtect / MotionProtect Plus
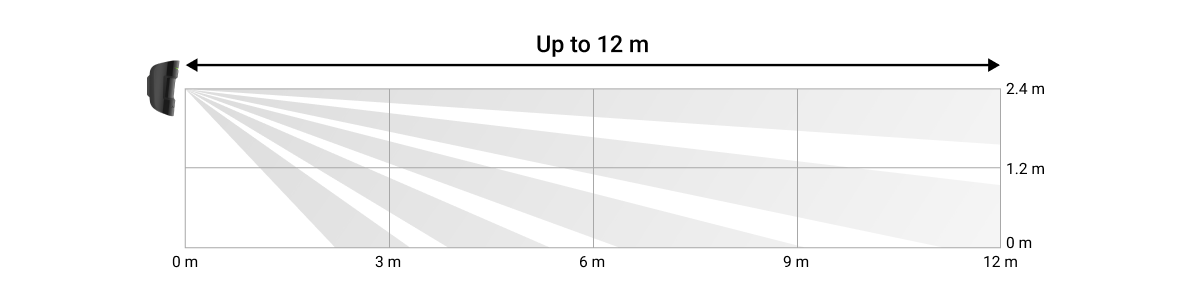
MotionProtect is a motion sensor designed for indoor use. It boasts a battery life of up to 7 years and monitors an area up to 12 meters in radius. It's pet-immune yet accurately detects the presence of humans from the very first step.
MotionProtect Plus incorporates a body temperature sensor that uses radio frequency scanning, filtering out interference from thermal signals. It can operate for up to 5 years thanks to its built-in battery.
👉 Buy motion sensors with microwave sensors - MotionProtect Plus
MotionProtect (MotionProtect Plus) operates within the Ajax security system by connecting to the Hub via the Jewellery protocol. The link range is up to 1700 meters (MotionProtect Plus is 1200 meters) in unobstructed environments. Additionally, the sensor can be used as part of a third-party central processing unit thanks to Ajax's integrated uartBridge or ocBridge modules.
The sensor device is set up via a mobile app, supporting both iOS and Android. Users will receive notifications via text messages, SMS, and phone calls (if enabled).
The Ajax security system is capable of operating independently, but users can still connect it to a central monitoring system provided by a private security company.
👉 Buy MotionProtect motion sensors
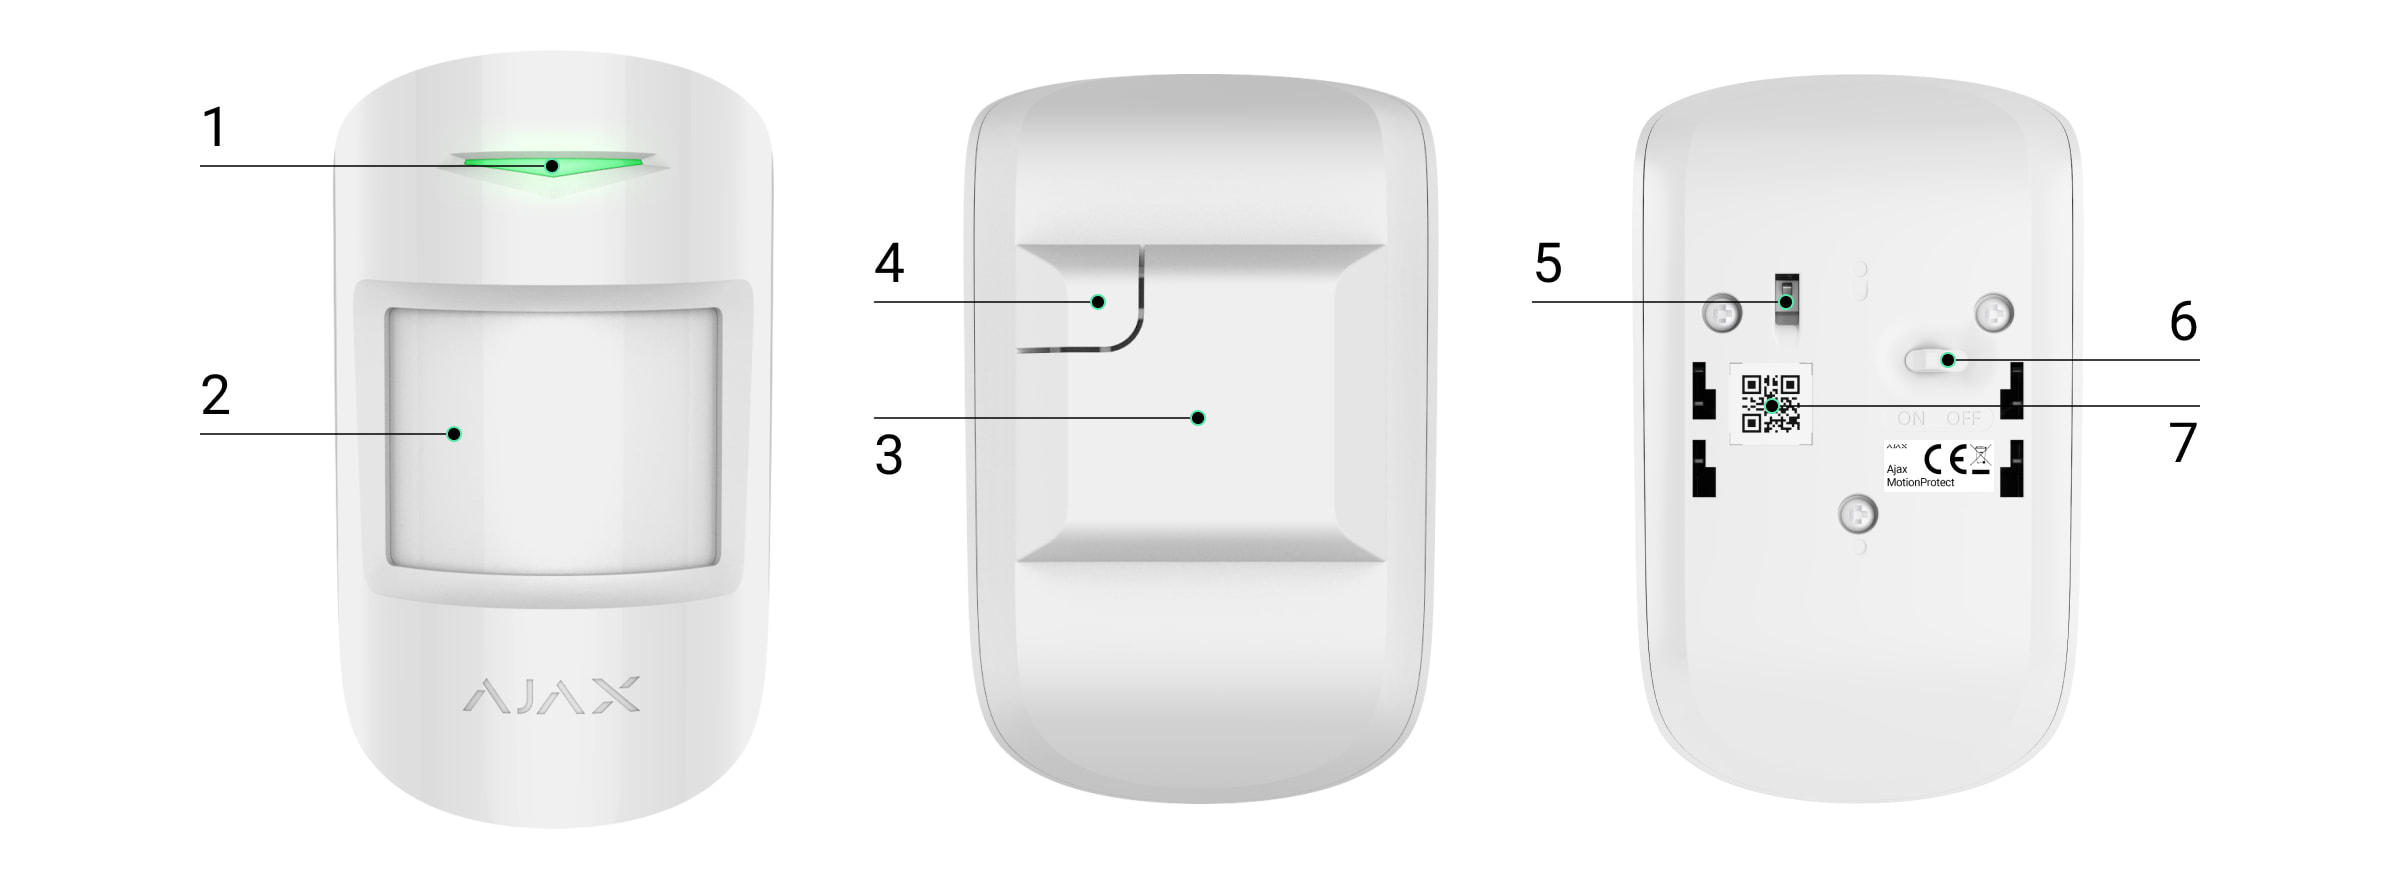
Features of the components
-
LED signal lights
-
Motion detection
-
SmartBracket - smart mounting board (The dotted section is necessary for vandalism protection in case the device is removed from its installation location)
-
Vandal-proof switch
-
Device switch
-
QR Code
How MotionProtect works
The MotionProtect device's PIR (Passive Infrared) temperature sensor detects intrusion into a protected room by detecting the movement of objects with temperatures close to human body temperature. This makes the device immune to pets – simply select the appropriate sensitivity in the settings.
When MotionProtect Plus detects motion, it scans the entire room using radio waves, eliminating false alarms caused by thermal interference: airflow, curtains heated by sunlight, fans, heaters, air conditioners, etc.
Upon detection, an alarm signal will be immediately sent to the Hub, activating the linked alarm sirens and reporting the event to the user and the security company.
If the device detects movement before the system is activated, it will not immediately switch to activation mode but will enter the next scan cycle of the Hub.
Connect the sensor device to the Ajax security system.
Before starting the connection:
-
Install the Ajax app on your phone and follow the instructions to set up the Hub (Hub, Hub Plus).
-
Create a user account, add the Hub to the app, and create at least one room.
-
Open the Ajax application.
-
Turn on the hub and check your internet connection.
-
Check and make sure that the Hub is in the Disabled mode and not updating (check the status displayed in the application).
⚠️ Only users with administrator privileges can add new devices to the Hub.
How to connect a device to the Hub:
-
Select “Add device” in the Ajax app.
-
Name the motion sensor device, scan the QR code or manually enter the device's code into the app (the code is located under the lid and on the box), and select the Room for the device.

Select “Add” — the countdown will begin.
-
Turn the device to the "On" position.

For the device to function effectively and without interference, the sensor must be placed within the wireless coverage area of the Hub (with a protective object).
A request to connect to the Hub will be sent shortly after the device is powered on. If you are unable to connect to the Hub, try turning the device off and on again after 5 seconds.
Once connected, the sensor device will appear in the list of connected devices. The frequency of signal scanning will depend on the settings on the Hub, with a default of 36 seconds.
Connect the device to a third-party security system.
To connect the device to a third-party system, you can use the uartBridge Ajax converter module or the ocBridge Plus Ajax converter module; follow the instructions for each module to connect.
Device states
Device → MotionProtect (MotionProtect Plus)
|
Category |
Meaning |
|
Temperature |
Temperature of the sensor device. Measured on the microprocessor and continuously updated. |
|
Signal strength |
Signal strength of the connection between the Hub and the sensor device. |
|
Battery level |
The remaining battery level of the device is displayed in 25% increments. |
|
Lid |
The device's anti-tampering mechanism reacts when the device is removed from its installation location or the housing is damaged. |
|
Entry delay, seconds |
Entry delay |
|
Delay when exiting, seconds |
Delay when exiting |
|
Connect |
Connection status between the hub and the device |
|
Sensitivity |
Sensitivity of the motion sensor |
|
Always on |
If activated, the sensor device will always be in the activated mode. |
|
Software |
The device's software version |
|
Device ID |
Unique device identification |
Customizations
Device → MotionProtect (MotionProtect Plus) → ⚙️
Customize |
Content |
|
first line |
The device name can be customized. |
|
Room |
Select a room where the device is actually installed. |
|
Sensitivity |
Choose the sensitivity of the motion sensor: For MotionProtect:
For MotionProtect Plus:
|
|
Always keep it activated. |
When activated, the device continuously monitors movement. |
|
Entry delay, seconds |
Choose the entry delay |
|
Delay when exiting, seconds |
Choose the exit delay |
|
Lag in night mode |
Enable delay when setting night mode. |
|
Activated in night mode |
If selected, the device will switch to activation mode when you enter night mode. |
|
The alarm sounds when motion is detected. |
If activated, HomeSiren and StreetSiren will trigger when motion is detected. |
|
Check the wave intensity. |
Switch the device to signal strength testing mode. |
|
Check the detection area. |
Switch the device to detection area testing mode. |
|
Check for decline |
Switch the device to attenuation test mode (only available on devices with software version 3.5 or higher). |
|
User manual |
Open the device's user manual. |
|
Unconnect the device. |
Disconnect the device from the hub and delete all settings. |
Before using a sensor as part of a security system, ensure you have selected the appropriate sensitivity for the sensor.
The "Always On" mode should be enabled if the device is placed in a room that requires 24/7 monitoring. Regardless of whether the system is activated or not, you will always receive notifications about any movement occurring in the room.
If any movement is detected, the device will activate the LED for 1 second and send an alarm signal to the Hub, the user, and the main control center (if the system is linked).
Sensor device alerts
Event |
Signal |
Note |
|
Turn on the sensor device. |
Turn on the green light for about 1 second. |
|
|
The device is connected to Hub, ocBridge, and uartBridge. |
Flashes continuously for a few seconds. |
|
|
Anti-sabotage/anti-vandalism measures are activated. |
The light turns green for about 1 second. |
An alarm is sent every 5 seconds. |
|
The battery needs replacing. |
During an alarm, the device flashes a green light slowly. |
Instructions on how to replace the battery are clearly stated in the "Battery Replacement Guide" section. |
Check the touch screen.
The Ajax security system allows for testing to assess the functionality of connected devices.
The testing modes will not start immediately but after a 36-second cycle when using the default settings. The start time of the test depends on the sensor's scan cycle settings (see the "Jeweller" settings in the Hub's settings).
Locations for installing sensor devices
The areas that are monitored and the effectiveness of a security system depend on the placement of sensors.
The installation location of the Ajax MotionProtect sensor is determined by the distance between the device and the hub; the presence of obstacles between the devices will affect radio wave transmission: walls, concrete floors, large objects placed in the room.
⚠️ Check the signal strength in the settings.
If the signal strength is only one bar, Ajax won't guarantee that the system will work perfectly. Do everything you can to improve the signal quality! At the very least, try moving the device; even just 20 cm can significantly improve the connection quality.
If, after moving, the device still has a weak or unstable signal, use a ReX signal booster.
Users should point the device's sensor towards the area of the room most likely to be intruded upon.
Ensure that furniture, plants, vases, decorations, or glass objects do not obstruct the device's view.
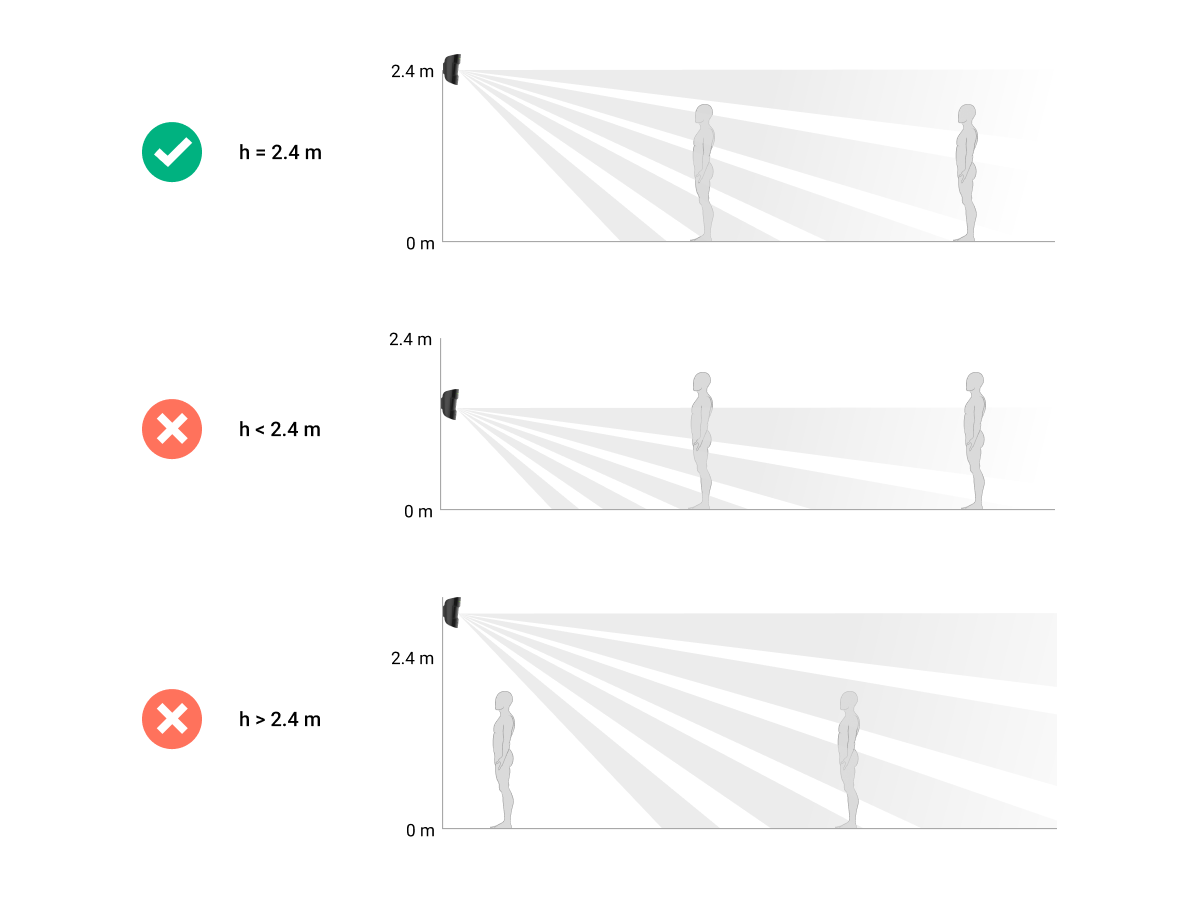
You should install the device at a height of 2.4 meters.
If the sensor is not installed at the recommended height, it will reduce the scanning range and affect the animal's immunity.
Install the sensor device.
Before installation, make sure you have chosen a location that meets the requirements of this instruction manual.
The Ajax MotionProtect sensor must be mounted on a vertical surface.
-
Attach the smart wall panel to the surface using screws, employing at least two fixing points (one of which should be above the vandal-proof section). After selecting other mounting hardware, ensure that it does not damage or deform the wall panel.
Double-sided tape should only be used as a temporary fixation solution for equipment. The tape will dry out over time and could cause the equipment to fall, leading to malfunction or potentially damaging the equipment due to the fall. -
Place the device on the mounting bracket. As soon as the device is secured on the SmartBracket, its LED will flash – this signals that the device's tamper-proof cover has been closed.
If the device's LED indicator light does not illuminate after installation on the SmartBracket, check the vandal-proof mode status in the Ajax Security System app and adjust the tightness of the mounting bracket.
If the device is pulled away from the mounting surface or detached from the mounting bracket, you will receive a notification.
Do not install this device:
-
Outdoor area
-
Directly facing a window, where the sensor is exposed to direct sunlight (you can install MotionProtect Plus).
-
For any object with the ability to change temperature rapidly (e.g., electric or gas heaters) (you can install MotionProtect Plus).
-
For objects that are moving and have a temperature close to human body temperature (e.g., curtains swinging above a fireplace) (you can install MotionProtect Plus).
-
In any location with rapid air circulation (where fans, windows, or doors are open), you can install MotionProtect Plus.
-
Being close to metal objects or bed surfaces can cause signal degradation and affect the image signal.
-
Under conditions where temperature and humidity exceed the device's operating limits.
Equipment maintenance
You should regularly check the functionality of the Ajax security system.
Clean the machine body of dust, cobwebs, or other dirt. Use only a soft, dry cloth for maintenance.
Do not use cleaning agents containing alcohol, acetone, or gasoline to clean the equipment.
The pre-installed battery ensures automatic operation for up to 7 years (with a central hub query frequency of 3 minutes). If the battery is detected to be low, the security system will send corresponding notifications and the LED will light up and turn off if the detector detects any movement or if the tampering device is activated.
👉🏻 Instructions for replacing the battery
Technical specifications
|
Sensor elements |
PIR sensor (Motion Protect Plus: PIR sensor and microwave sensor) |
|
Motion detection range |
Up to 12 meters |
|
Viewing Angle (Horizontal/Vertical) |
88.5° / 80° |
|
Pet immunity options |
Yes, it's up to 50 cm tall and weighs 20 kg. |
|
Vandal-proof switch |
Have |
|
frequency band |
868.0 – 868.6 MHz or 868.7 – 869.2 MHz, Depending on the region |
|
Maximum RF output power |
Up to 20 mW |
|
Radio signal module |
GFSK |
|
Radio signal range |
Up to 1700 m (unobstructed view) (Motion Protect Plus up to 1200 m) |
|
Source |
1 CR123A battery, 3V |
|
Battery life |
Up to 7 years (Motion Protect Plus coverage for up to 5 years) |
|
Operating temperature range |
For Ukraine and the East African Community: From -10°C to +40°C Other areas: From +5°C to +40°C |
|
Operating humidity |
Up to 75% |
|
Size |
110 x 65 x 50 mm |
|
Weight |
86 g (Motion Protect Plus 96 g) |
The complete set includes
-
MotionProtect (MotionProtect Plus)
-
CR123A battery (installed inside)
-
Installation screw set
-
User manual
Guarantee
The product comes with a 2-year manufacturer's warranty.
If the device is not working as designed, please contact our technical support team before sending it in for warranty service – as over 50% of cases are simply issues with settings adjustments.