
Transmitter - User Manual
TRANSMITTER USER GUIDE: A transmitter is a module that connects third-party sensor devices to an Ajax system. It transmits alarm and alert signals when the tamper-proof mechanism of an external device is activated.

TRANSMITTER USER GUIDE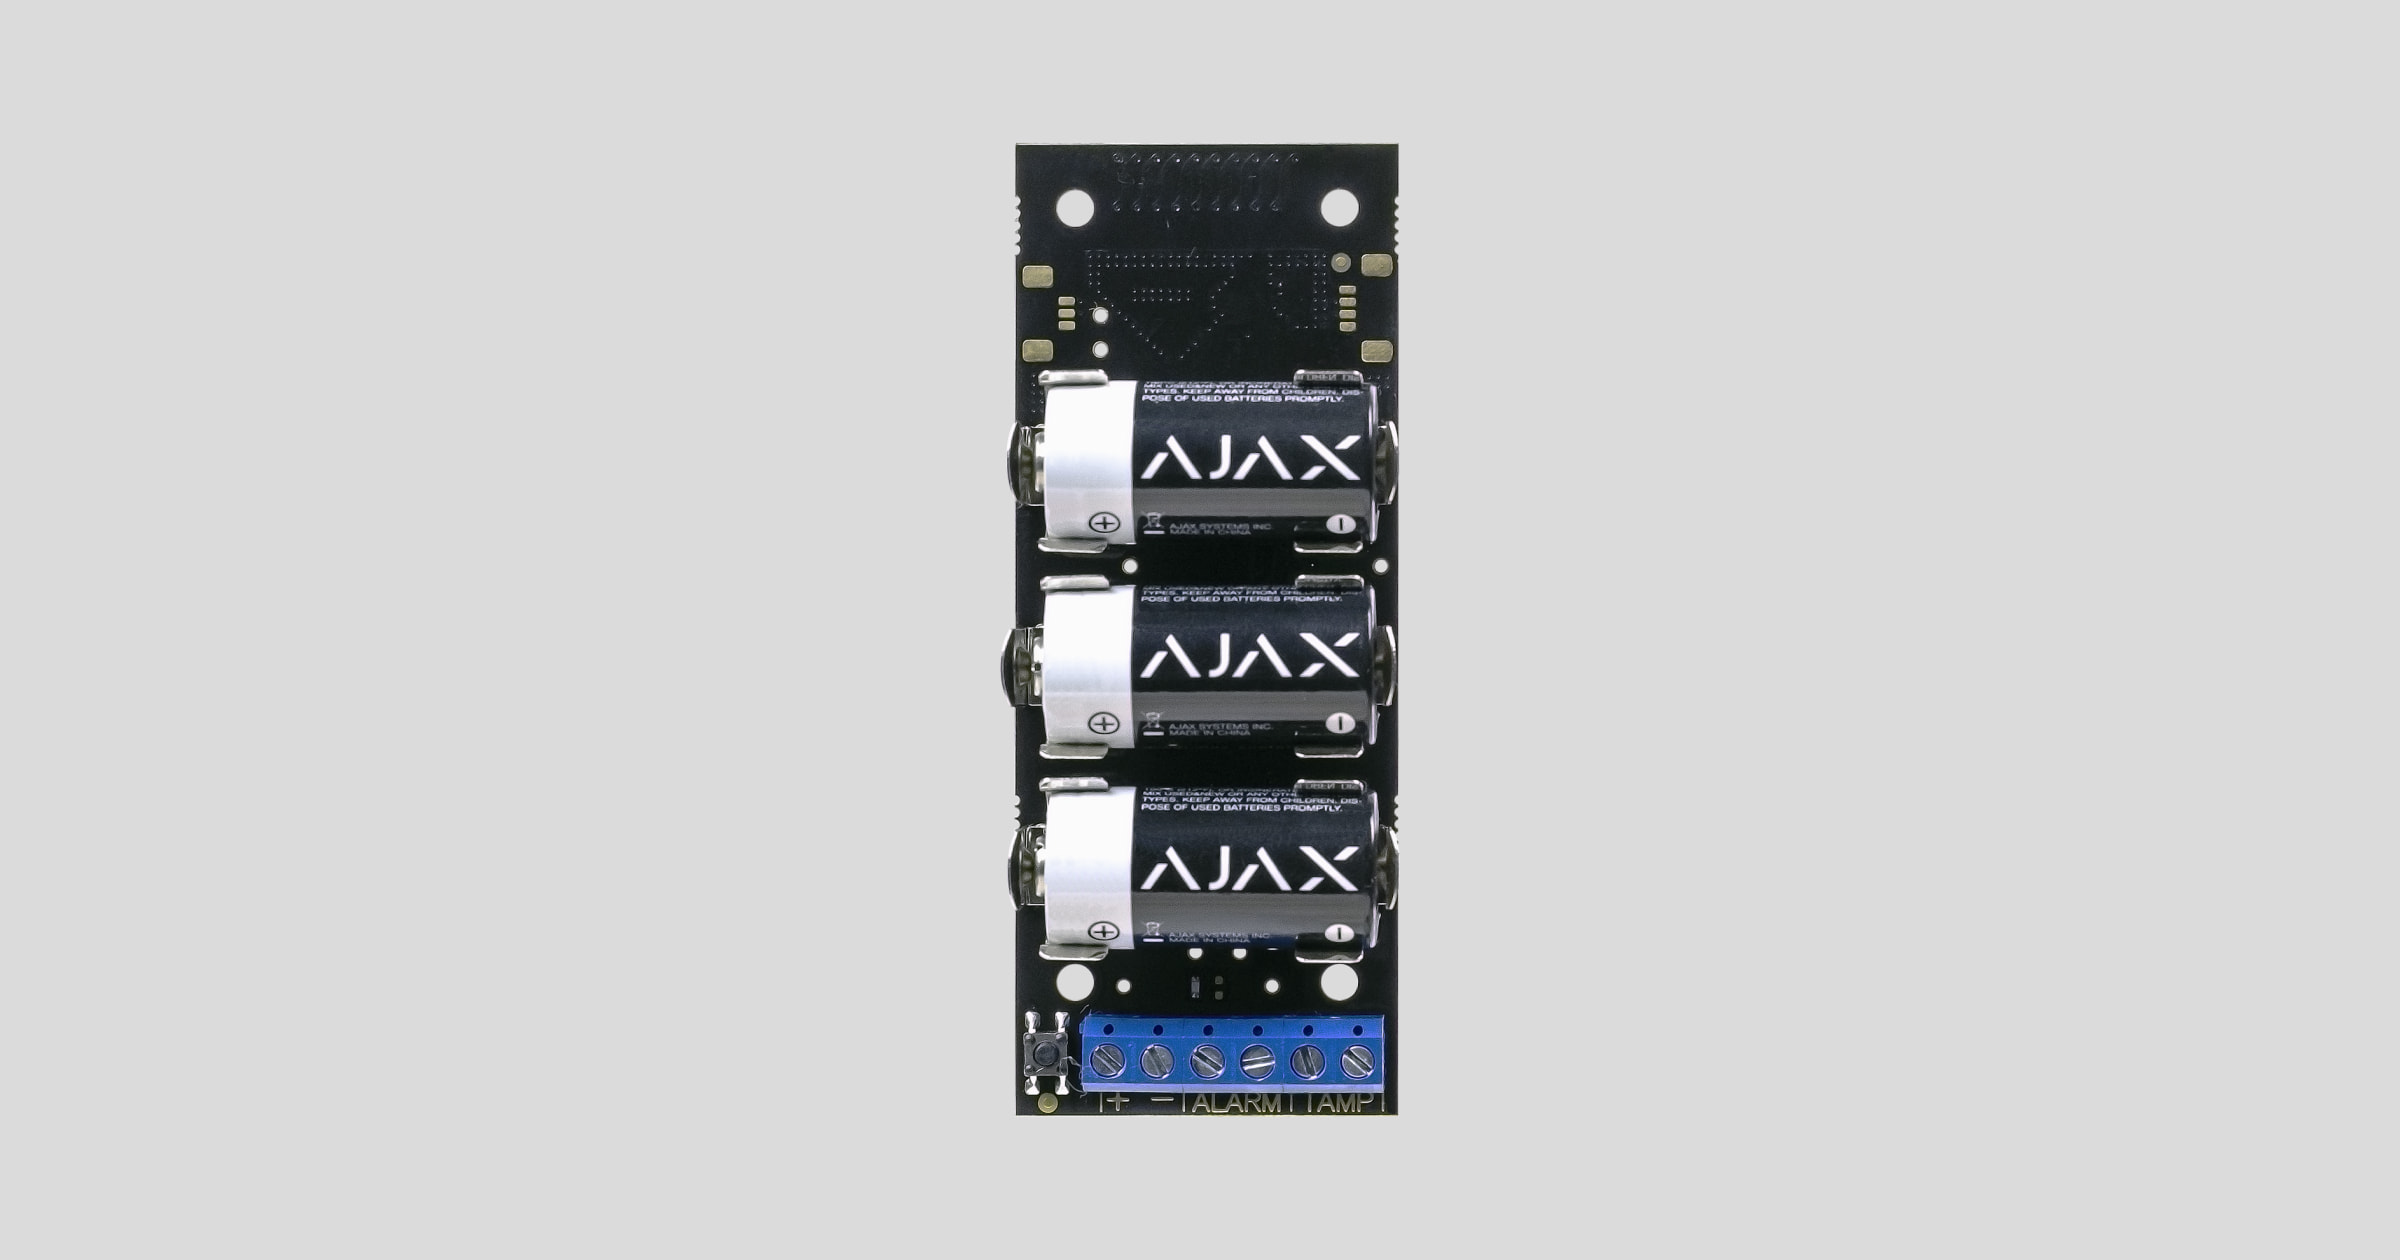
The transmitter is a module used to link third-party sensors to an Ajax security system. It transmits alarm and warning signals when the tamper-proof mechanism of an external device is activated. It also has its own accelerometer to help protect the module from being removed. The module is battery-powered and can also power the connected device.
The transmitter is only connected to the Ajax secure system (it cannot be linked to third-party systems) using the Jeweler secure protocol, with a range of up to 1,600 meters in an unobstructed environment and not inside another device casing.
Connectivity with ocBridge and uartBridge integrated modules is not provided.
Transmitter is configured through an app available for iOS and Android.
The Ajax security system is capable of operating independently, but users can still link the system to the main monitoring centers of security companies.
👉 Buy the Transmitter Integrated Module now!
Features and details

-
QR Code
-
Power connector from the battery.
-
LED signal lights
-
ON/OFF button.
-
Output: power, alarm signal, anti-tampering signal for the device.
Operating procedures
The transmitter device connects external alarm devices to the Ajax system: indoor and outdoor motion sensors, door opening sensors, vibration sensors, breakage sensors, fire sensors, gas leak sensors, etc. Compatible with sensors with NC/NO contacts.
The transmitter receives alarm information and activates the external detector's tampering button via the terminals. A pair of separate terminals ensures power is supplied to the external detector from the module's 3.3V battery.
Connect the sensor to the Hub.
Before starting the connection:
-
Install the Ajax app on your phone and follow the instructions to set up the Hub (Hub, Hub Plus).
-
Create a user account, add the Hub to the app, and create at least one room.
-
Open the Ajax application.
-
Turn on the hub and check your internet connection.
-
Check and make sure that the Hub is in the Disabled mode and not updating (check the status displayed in the application).
⚠️ Only users with administrator privileges can add new devices to the Hub.
How to connect a device to the Hub:
-
Select “Add device” in the Ajax app.
-
Name the motion sensor device, scan the QR code or manually enter the device's code into the app (the code is located under the lid and on the box), and select the Room for the device.
-
Turn on the device by pressing the small black button.

For the device to function effectively and without interference, the sensor must be placed within the wireless coverage area of the Hub (with a protective object).
A request to connect to the Hub will be sent shortly after the device is powered on. If you are unable to connect to the Hub, try turning the device off and on again after 30 seconds.
Once connected, the transmitter will appear in the list of connected devices. The frequency of signal scanning will depend on the settings on the hub, with a default of 36 seconds.
Device states
Device → Transmitter
|
Category |
Value |
|
Temperature |
The device's temperature is continuously measured on the microprocessor. |
|
Signal strength |
Signal strength of the connection between the hub and the device. |
|
Battery level |
The device's battery level is displayed in 25% blocks. |
|
Lid |
Terminal device vandal-proof status |
|
Login delay, seconds |
Entry delay |
|
Output delay, seconds |
Delay when exiting |
|
Connect |
Connection status of the device and the hub |
|
Always operational |
If activated, the device remains in the activated state. |
|
Alert if moved |
If activated, the device's accelerometer will detect when the device is being moved. |
|
Software |
Device software |
|
Device ID |
The device's unique identification ID. |
Setting
Device → Transmitter → ⚙️
|
Function |
Content |
|
first line |
The device name can be customized. |
|
Room |
Select the room where you want to add the device. |
|
Connection status with the terminal device |
Select the default state for the terminal:
|
|
Terminal type |
Choose the type of touch terminal device:
|
|
Anti-sabotage mode |
Select the default anti-tampering mechanism for the terminal device:
|
|
Always keep it activated. |
If activated, the device will always sound an alarm even if the system is not activated. |
|
Login lag |
Choose the entry delay time. |
|
He was late when he left. |
Choose the delay time when exiting. |
|
Lag in night mode |
Enable delay in night mode. |
|
Alert if moved |
The accelerometer in the device will detect if it is moved and trigger an alarm. |
|
Power supply for the terminal |
Adjust the 3.3V power supply for the terminal:
|
|
Activate in night mode. |
If activated, the device will switch to active mode when the system is put into night mode. |
|
Activate the siren when an alarm is triggered. |
If activated, HomeSiren and StreetSiren will sound their sirens when a signal is detected. |
|
Check the wave intensity. |
Switch the device to signal strength testing mode. |
|
Check for decline |
Switch the device to signal attenuation test mode (only available in software version 3.50 and above). |
|
User manual |
Open the device's user manual. |
|
Unconnect the device. |
Disconnect the device from the hub and delete all settings. |
Set the following parameters in the Transmitter settings:
-
The state of the external detector contact can be normally closed or normally open.
-
The type (mode) of the external detector can be blocked or pulsed.
-
A dummy mode, which can be closed normally or opened normally.
-
Acceleration trigger alarm - you can turn this signal on or off.
Select the power mode for the external detector:
-
The Hub shuts off when deactivated - the module stops supplying power to the external detector when disabled and does not process alarm signals from the terminal. When the detector is reactivated, power is restored, but alarm signals are ignored for the first 8 seconds.
-
Always disabled - The transmitter saves energy by shutting off the power to the external detector. Signals from the terminal are processed in both pulse and semi-stable modes.
-
Always active - this mode should be used if there are any issues in the "Shut down when Hub is disabled" section. When the security system is equipped, signals from the ALARM terminal are processed no more than once every three minutes in pulse mode. If bistable mode is selected, those signals will be processed immediately.
If the "Always On" operating mode is selected for the module, the external detector will only be powered in "Always On" or "Off when Hub is deactivated" mode, regardless of the security system status.
Operation signal
|
Event |
Signal |
|
The module is enabled and registered. |
The LED lights up when you press the ON button. |
|
Registration failed |
The LED flashes for 4 seconds with a 1-second interval, then flashes rapidly 3 times (and automatically switches OFF). |
|
The module has been removed from the central device list. |
The LED flashes for 1 minute with a 1-second interval, then flashes rapidly 3 times (and automatically switches to OFF). |
|
The module has received an alarm/tampering signal. |
The LED lights up for 1 second. |
|
Out of battery |
It gently lights up and turns off when the detector or tampering signal is triggered. |
Check the touch screen.
The Ajax security system allows for testing to assess the functionality of connected devices.
The testing modes will not start immediately but after a 36-second cycle when using the default settings. The start time of the test depends on the scanning cycle settings of the sensor device (see the “Jeweller” settings in the Hub settings).
-
Check signal strength
-
Check for attenuation
Connect the module to the wired detector.
The transmitter's position is determined by its distance from the processing center and the presence of any obstacles between the devices that hinder radio signal transmission: walls, floor inserts, large objects in the room.
Check the signal strength level at the installation location.
If the signal level is only one bar, we cannot guarantee the stable operation of the security system. Take possible measures to improve signal quality! At a minimum, move the equipment – even a 20 cm change can significantly improve reception quality.
If your device has a low or unstable signal strength, use a ReX radio range extender.
The transmitter should be placed inside the wired detector housing. The module requires a minimum space of the following dimensions: 110 x 41 x 24 mm. If installation inside the detector body is not possible, any available housing may be used.
-
Connect the transmitter to the detector via the NC/NO contacts (select the relevant settings in the application) and COM.
The maximum cable length for connecting the sensor is 150 m (24 AWG twisted pair). This value may vary when using different cable types. -
Function of the transmitter terminal
![]()
-
+ - — power output port (3.3 V)
IMPORTANT! Do not connect an external power source to the generator's power output. This may damage the device. -
ALARM — Alarm signal gate
-
TAMP — Vandal-Proof Signal Gateway
Protect the generator in its housing. Plastic mounting brackets are included in the installation kit. The generator should be installed on them.
Maintenance and battery replacement
The device requires no maintenance.
👉🏻 Instructions for replacing the battery
Technical specifications table
|
Connect to an external device. |
Alarm and Anti-Sabotage (NO/NC) |
|
Signal processing mode |
Pulse and Stable Selling |
|
Source |
3 x CR123A, 3V batteries |
|
The ability to power the device. |
Yes, 3.3V |
|
Protect from vandalism |
Accelerometer |
|
Bandwidth |
868.0–868.6 MHz and 868.7–869.2 MHz |
|
Maximum power |
Up to 20 mW |
|
Radio module |
GFSK |
|
Connection distance |
Up to 1,600 m (unobstructed view) |
|
Battery frequency between Hub and device |
12–300 seconds |
|
Operating temperature |
From -25°C to +50°C |
|
Operating humidity |
Up to 75% |
|
Size |
100 x 39 x 22 mm |
|
Mass |
74 g |
The complete set includes
-
Transmitter
-
CR123A Battery - 3 Pins
-
Installation kit
-
User manual
Guarantee
The product comes with a 2-year manufacturer's warranty.
If the device is not working as designed, please contact our technical support department before sending it in for warranty service – as over 50% of cases are simply issues with settings adjustments.